So You Want to Create Columns in Google Documents?

I would say that the number one complaint that I get about Google Documents is the unability to create columns. Some think that this is a common task that people use and wonder why it has not been implemented. There is however a work around to getting columns to show up on a Google Document – done by using a table. Below is an example of how a table can actually be made to look like two column section in a Google Document (check out the red text in the Google Document).


IMPORTANT TO NOTE: Unlike traditional columns, you have to determine when you want to start typing into the second column on the Google Document. For those people used to using columns in Word, you know what I am talking about. Word automatically starts typing into the next column when it gets to the bottom of a page. In this instance, since we are not using a traditional column setting, you have to tell Google Documents that you are done typing in one cell of a table and want to type in the second cell of the table.

STEPS TO MAKING THIS HAPPEN:

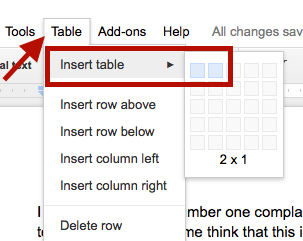
  • Place your cursor where you want to ‘insert columns’. Then select a 2 x 1 table from the Table Menu.

  • Suggestion: Write all of your content in the first cell of the table. Once you are done with editing your content, count the total number of lines and divide it by two. This will then tell you what you need to highlight and copy in the second cell so that the text will line up perfectly. This could become annoying when it comes down to editing your content – but at least you can get your ‘column feel’ when creating columns is not an option in Google Documents. Your table will look something like this:
  • Highlight the entire table and right click. Choose ‘Table Properties’

  • Be sure to change the border color to white so that the borders of the cells no longer show to make the text look like it was never created in a table.

While this is not a perfect way of making columns happen in Google Documents, at least it gives you a bit more flexibility with how text can appear. Hope this helps!

Merging PDF Files into 1 PDF

I was caught in a situation today where I had to merge some PDF files together. I had three PDF files that I had to convert into one PDF file. This was the first time that I had ever had to do such a thing.

I remembered a coworker, Nicole Cassamassino, telling me about a chrome app called PDF Mergy.  (click on the link to check out the app in the chrome webstore) Basically, you can upload PDF files to the service and it will magically merge them together into one file.

What I liked about this chrome app is that you can upload PDF files either from your computer or from Google Drive. I also was able to upload a Google Document from my drive (that was not a PDF file) and it converted it to a PDF right away. Once you have uploaded all of your files, you have a choice of having the merged file saved to your computer or to your Google Drive.

So, if you are interested, here are the steps

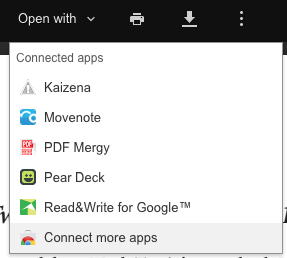
1. Add PDF Mergy app to your Google Drive account  – choose Connect more apps under the Open with drop down menu when you are viewing a PDF in your Google Drive Account.

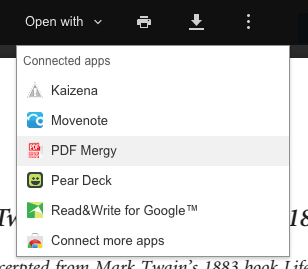
2. Go to https://pdfmerge.w69b.com or choose PDF Mergy under the Open With drop down after you connected to your account and are viewing the PDF that you want to merge with another PDF file.

3. If you access PDF Mergy from Google Drive, it will ask you to connect to your Drive account. (You could also use it without connecting but it will not be able to access PDF files from your Drive – just your computer). This should only prompt you the first time you use the app.

4. Upload all of your files. Then determine where you would like to merged file to go.

It was very easy and quick to use! I know that there are many different ways that you can merge PDF files. I only used this one seeing as though it was recommended to me one day.