
 As indicated in an earlier post, I challenged myself to take an online course on how to create animated GIFs, with Jake Miller being the instructor. I have discovered that creating high quality GIFs sure take some thinking (and time – just like anything else when you first start learning). Prior to taking the course, I would use Snagit to record my screen. Then, with the click of one button, I could say create a GIF. Could I continue to do this? Sure. However, knowing what I know now, I really should keep my audience in mind. They don’t want to watch a GIF that is a minute or longer. Plus, there should me more details provided in the GIF to help the viewer out.
Category: GIF
Learning From Others is Important

As my friend Mary Marotta says,
“Sure we have the ability to learn [insert particular tool here]. But you know what, it might be good to find someone who is an expert at [insert tool] to get a different perspective.”
I took her advice recently and decided to take Jake Miller’s #EduGif Academy course online this summer. I have been a big fan of Jake’s as he makes amazing GIFs. It seems as though every day he is sharing a new tip or trick via a GIF he made. (I am not sure how he has time to do all of these but he does GREAT work!)
For the past year, in some of the resources that I have created for teachers and students at the high school I work at, I have made GIFs. I find that GIFs can share the information that you need to in an efficient, quick way. However, I really did not take the time to plan out the GIFs. Instead, I would just record my screen and then convert the video into a GIF. At the end of June, I saw a post of Jake’s promoting his online course and thought, why not…it is time for me to be the student again.
I am writing this blog post half way through the course and could not be more thrilled that I took up this opportunity. Below are two videos that I have created thus far that I plan to use at the beginning of the school year for the students at the high school. You will notice that they are still videos. Jake wanted to make sure we knew the basics prior to moving into GIFs, and by basics…I really mean not basics as I am learning some cool tricks to making my videos that much better.
While these videos are not perfect, I hope you enjoy them. The most favorite feature of the videos you ask? It is the ability to zoom in an out of particular areas of the screen. I feel as though this not only helps the viewer but also makes it ‘look more professional’.
Managing Chrome Extensions
Up-To-Date Chrome Browser
Can’t wait to move on to GIFs.
And that is my Spiel…
Day 12 of Google: Creating Your own GIF with AutoDraw, Photos, and Slides
For day twelve of Google, we are going to look at how AutoDraw, Google Photos and Google Slides can be used to help create your own GIF for a presentation.
GIF files and bitmojis have appeared in text messages/group chats for awhile now. I am noticing that more and more people are including these in presentations now. In most cases, gifs that are used are ones that have been found online. Well, with the help of three applications, you can create your own GIF. What makes this process even easier is the fact that Google Photos is now an option for inserting images into a Google Slide presentation.
Below is an example of something that was created in AutoDraw, uploaded into Google Photos to create a ‘GIF’. This file can then be inserted into any location that allows for images. Below will walk you through the process…

Step 1: AutoDraw
I have written an earlier blog post on Google AutoDraw. AutoDraw is a great way for students to create their own visual with the help of artificial intelligence. I for one am not a great drawer. I can use all the help that I can get with my drawings. This is also a great way to get ‘free to use’ images.
- Create what you want to turn into a GIF. My example will be a basketball moving as if it is being thrown in the air.
- After my image is all set, take a screenshot
- Move items that you ‘drew’ (in my case, I will move the basketball)
- Take another screenshot
- Repeat step 3 and 4 until you have all the necessary screenshots
Step 2: Google Photos
Next, we will use Google Photos (photos.google.com). The reason behind this is so that it will automatically create the GIF for us. Google Photos calls this an animation.


- Once in Google Photos, choose upload on the top right corner
- Upload all of the screenshots (or images you want to eventually make into a GIF file)
- On top right corner, select the plus button and choose animation
- Select all images you want to be part of the gif ‘animation’
Step 3: Google Slides (or Docs, Drawing)
Next, you will want to open the application that the GIF file should be placed – in this case Google Slides. With Googles latest feature, it is even easier to add images.

- Open up Google Slide presentation
- Go to slide you want the image to be located on
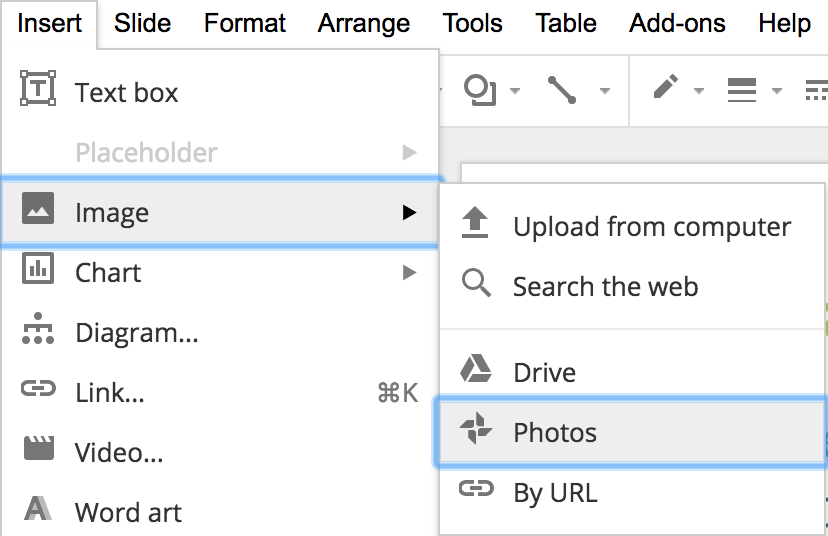
- Under the insert menu, choose Image followed by Photos. Google will search your Google Photos and you will select your GIF file.
And that is my Spiel…
