 Over the past month, I have been exploring around with a tool called Adobe Express (formally called Adobe Spark). Adobe Express is a tool that provides a user an opportunity to create:
Visual Post, Video, Web Page
Adobe Express works on the web (works great on Chromebooks) as well as through mobile apps (Adobe Spark Post, Adobe Spark Video, Adobe Spark Page). The user is able to log into Adobe Spark with their Google Account – it will ask for a birth date. (If you are planning on using this with students below 13, you should talk with your tech integrator to see if this is in fact a tool you should use with your students.) Below is an example of what you can do with Adobe Voice. This video speaks to the three components of Adobe Spark.
https://spark.adobe.com/video/NqYkC7Ur76B5d/embed
Examples of the Tool
This is an example of a Spark Post that I have created.
Clicking on this link will bring you to a Spark Page that I am currently working on for Hour of Code.
Using this Tool in Your Classroom
You could easily use Spark Post to highlight a song, quote, or poem. Students can use Spark Video to promote a product, explain an idea or concept, verbalize a story they wrote, etc. The possibilities are endless. Rather than using Google Slides to present a topic, students could use Spark Page. Students could even take it to the next level and integrate Spark Posts and Spark Videos into their Spark Page.
Instructions
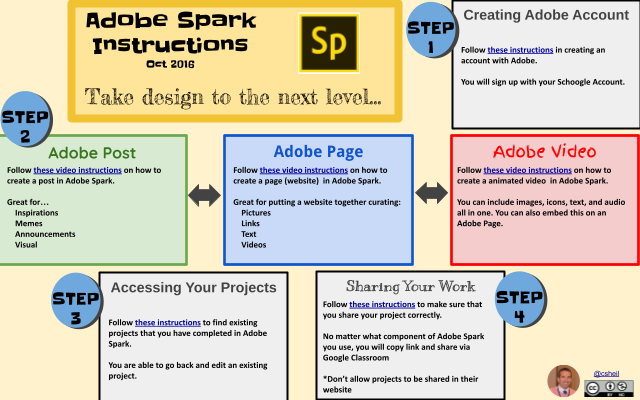
I have created a 4 step process instructions guideline for students and staff. You can access the actual link to the Google Drawing HERE. The links on the Google drawing will either demonstrate/explain what to do either in GIF or Video format.

Why I Like Adobe Spark
There are many reasons why I like this tool. To name a few…
- Very easy to use
- Visually appealing
- Allows for creativity
- Allows for student voice and choice
It is important to note that this does not replace G-Suite and its tools. This, however, is a great alternative to the powerful collaboration tool G-Suite from time to time. My challenge for you is to out one of the tools yourself within the next month – once you do one, you will be hooked!
As always, if you have any questions or want to talk about how this tool can be integrated in your own classroom, you know where to find me.
And that is my Spiel…
 Screencastify has been a ‘go to’ tool for our school, especially since it works so nicely with chromebooks. For those of you who have not used Screencastify, I highly recommend that you check it out.


