So You Want to Create Columns in Google Documents?

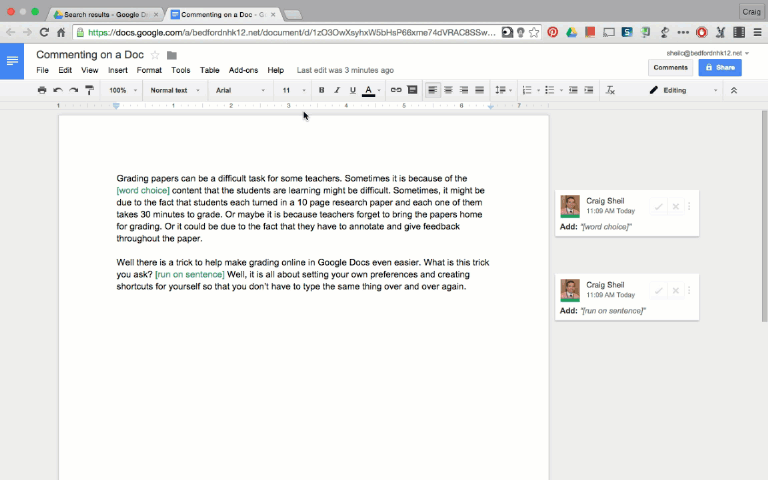
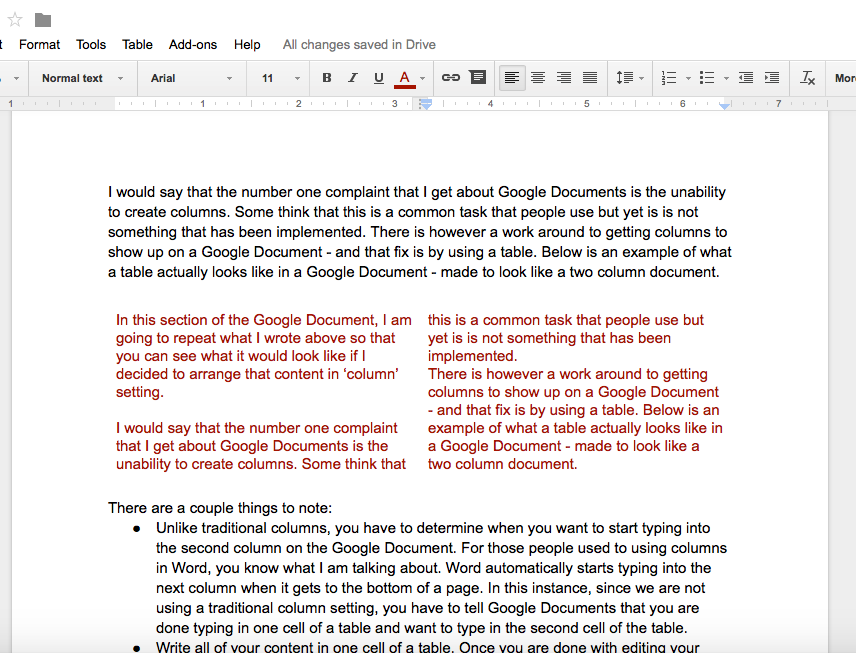
I would say that the number one complaint that I get about Google Documents is the unability to create columns. Some think that this is a common task that people use and wonder why it has not been implemented. There is however a work around to getting columns to show up on a Google Document – done by using a table. Below is an example of how a table can actually be made to look like two column section in a Google Document (check out the red text in the Google Document).


IMPORTANT TO NOTE: Unlike traditional columns, you have to determine when you want to start typing into the second column on the Google Document. For those people used to using columns in Word, you know what I am talking about. Word automatically starts typing into the next column when it gets to the bottom of a page. In this instance, since we are not using a traditional column setting, you have to tell Google Documents that you are done typing in one cell of a table and want to type in the second cell of the table.

STEPS TO MAKING THIS HAPPEN:

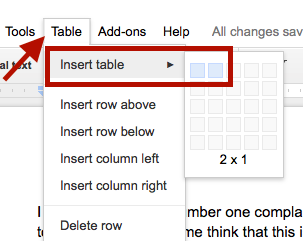
  • Place your cursor where you want to ‘insert columns’. Then select a 2 x 1 table from the Table Menu.

  • Suggestion: Write all of your content in the first cell of the table. Once you are done with editing your content, count the total number of lines and divide it by two. This will then tell you what you need to highlight and copy in the second cell so that the text will line up perfectly. This could become annoying when it comes down to editing your content – but at least you can get your ‘column feel’ when creating columns is not an option in Google Documents. Your table will look something like this:
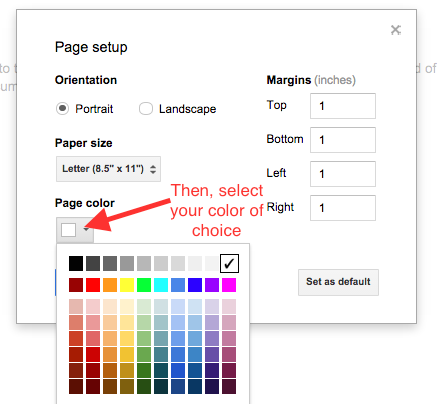
  • Highlight the entire table and right click. Choose ‘Table Properties’

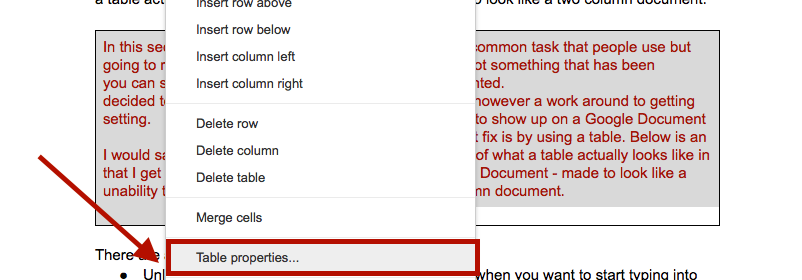
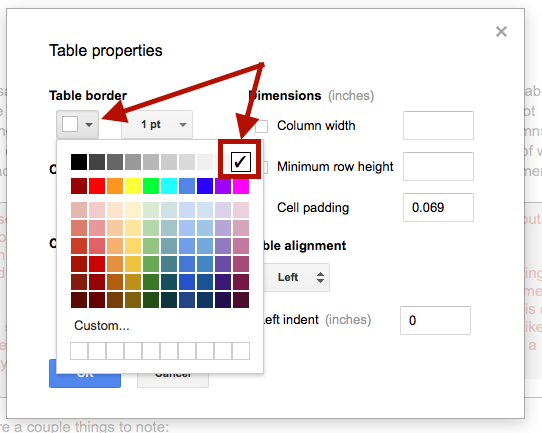
  • Be sure to change the border color to white so that the borders of the cells no longer show to make the text look like it was never created in a table.

While this is not a perfect way of making columns happen in Google Documents, at least it gives you a bit more flexibility with how text can appear. Hope this helps!

Creating Your Own Shortcuts For Efficient Grading

More and more teachers are making the switch from requiring students to turn in physical copies of papers to the electronic copy route. I won’t get into which way is the right way to go because lets be honest, there are advantages and disadvantages for both systems. However, with Google creating Google Classroom, lots of teachers have made the switch.

So let’s say that you are a teacher that has about 50 electronic papers waiting for your attention in your Google Drive account. You want a way so that you can still provide meaningful feedback but you don’t want to spend hours doing it.

Here is your solution, create your very own shortcuts! Basically, if you have phrases that you write out a lot – why not create a short cut so that you don’t have to write out all of the words that you want to say. It is very easy to do:

1. Go to preferences under the Tools menu

2. You will notice that Google already has shortcuts created for you. (If you don’t want them, you can delete them.) You are able to create your own shortcuts to make Google more helpful for you. You will notice two empty boxes: ‘Replace’ and ‘With’. Type a short cut in the ‘Replace’ box and write the phrase or sentence that you want to pop up in the ‘With’ box.

For Example:

  • Every time you write wc – you can have Google automatically replace it with Word Choice – think about what you are saying here 
  • Every time you write ro – you can have Google automatically replace it with Run on Sentence
  • Every time you write cit1 – you can have Google automatically replace it with ‘link to a YouTube video demonstrating how to cite a source properly’ 
The possibilities are endless as to what you can include.
Things to Keep in Mind:
  • It is very important that you chose codes that will only be used when you are grading. For instance, you would never want I to be a code for something. If you did, no matter what you were doing in Google, an I would be changed to whatever was placed in the ‘with’ box.
  • Make sure you are in suggestion mode when you are inserting these comments.
  • Once you type the code, just hit the space bar and move on to your next comment.
  • If your codes are very unique to one project/paper, you could always go back into the preference settings and delete the shortcuts you created.
This is just one example of how you can have Google help you provide feedback quickly, but in a meaningful way. (A big thanks goes to Karen Desjadon @kdesjadon for demonstrating this to me.)

Using a Footnote for Branding Purposes

Why not give yourself credit where credit is due! Many people only use a footnote for when they are writing papers and need to cite sources. I tend to use a footnote anytime I create documentation whether I am in a Google Document or a Google Slide.

Ways of using a footnote in your documentation/instructions/presentations:

  • class hashtag
  • class/teacher twitter account
  • class mascot image
  • school logo
The possibilities are endless.

Google Slide:
Below is an example of what my ‘footers’ look like on a Google Slide. I tend to always include my Google profile picture (that will link to my Google+ account), a link to my Twitter account, as well as  my tech hashtag. You will also on the far right I have a picture of the BHS tech logo.

To make this happen for every slide automatically, select Master under the View Menu.

Be sure to select the Master slide on the left hand side and include anything on that slide that you want to show up on every slide. This is how I added all of the items at the bottom of my presentation slides. 

Keep in mind that you do not need to create this ‘master slide’ ahead of time. You could add items to the master slide at any time and it would automatically add to the presentation.

Google Document:

To make this happen in a Google document, select Footer under the Insert menu. Then you can add links, images, and text anywhere in the footer. Anything you put in the footer of a Google Document will automatically show up on all of the pages.

** Just know that while you create a footer to give yourself credit, this does not stop anyone from making a copy of your presentation or document, deleting it and adding their own name to it. I have a mindset that people will give credit where credit is due.

Change Background of Google Documents

So, did you know that you could change the background of a Google Document? To be honest, it never even crossed my mind and I have been using Google for years! I knew that you could change color of text and cells in a Google Spreadsheet, but never the entire background of a Google Document.

Below are the steps to help make this become a reality for you…

Why Might This Be Good?

  • Embedded Google Documents on Google Sites would be easier to find and read.
  • Colors of documents could indicate type of document (practice, assessment, information, etc)

Good to Know…

  • If you are going to print, might not be a good idea to have a color background
  • If you are going to choose a color, choose one that is very light so that the text can be read