Polling Students through Google Slides

Receiving formative feedback can be very helpful. There are many tools out there that help get that feedback, whether you use Kahoot!, Quizizz, Socrative, or Peardeck (to name a few).

Just recently, Poll Everywhere came out with a Chrome extension that allows Google Slide users the ability to embed Poll Everywhere questions right in a presentation.

I can see this being very useful when you know you want to ask your students a very quick question but don’t want to spend the time to add the presentation in a Peardeck or Kahoot! Poll Everywhere does have a free educator account (which is great) but only limits you to 40 responses per question. So, those of you who have class sizes higher than that would not be able to use this tool.

So the next time you have that moment of ‘I want to quickly add a question or two to a google slide presentation’ give Poll Everywhere a try.

STEP 1:
Get the Poll Everywhere Chrome extension. The actual official title of this Chrome extension is: Polling in Google Slides (This chrome extension has already been pushed to the staff in my district).

It is important to note that you will not ‘see’ the chrome extension with the rest of the extensions in the Chrome browser. Instead, a new menu option will show up when you have a Google Slide opened on your screen.

STEP 2:
Go to Poll Everywhere and sign up for the free K-12 Educational Plan. Click HERE for the direct link.

STEP 3:
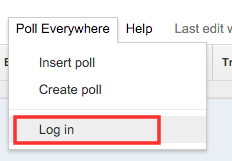
Open up a Google Slide presentation that you would like to include a question or two in your presentation. You will notice the new menu option: Poll Everywhere.

STEP 4:
Log in to your Poll Everywhere account.

STEP 5:
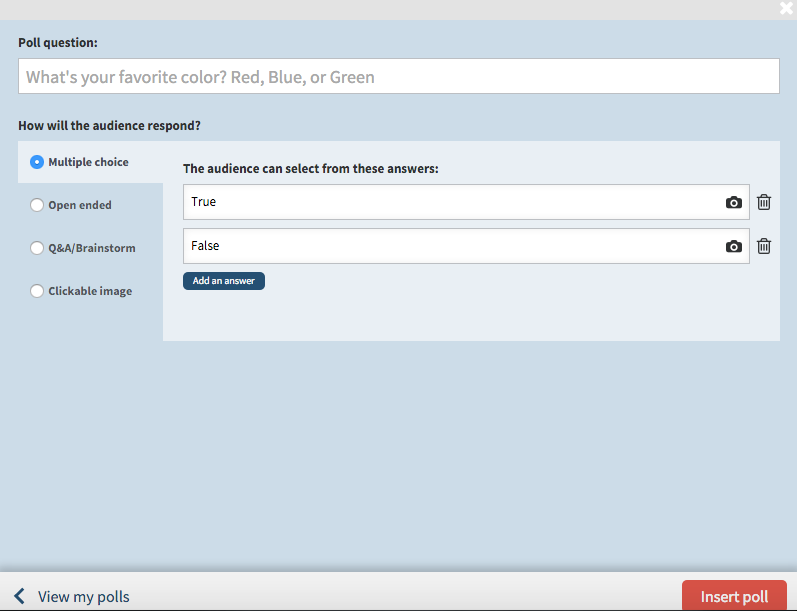
Then select Create Poll. A pop up window will appear for you to choose the type of question. Once you hit insert poll, it will automatically insert a slide with that poll question on it.

Important to Note: The actual poll question will not show until you are in present mode of your slide presentation. While in editing mode, you will see the following:

If you have any questions on how you can use this extension or you need assistance making this work for you, just let me know.

Using a Footnote for Branding Purposes

Why not give yourself credit where credit is due! Many people only use a footnote for when they are writing papers and need to cite sources. I tend to use a footnote anytime I create documentation whether I am in a Google Document or a Google Slide.

Ways of using a footnote in your documentation/instructions/presentations:

  • class hashtag
  • class/teacher twitter account
  • class mascot image
  • school logo
The possibilities are endless.

Google Slide:
Below is an example of what my ‘footers’ look like on a Google Slide. I tend to always include my Google profile picture (that will link to my Google+ account), a link to my Twitter account, as well as  my tech hashtag. You will also on the far right I have a picture of the BHS tech logo.

To make this happen for every slide automatically, select Master under the View Menu.

Be sure to select the Master slide on the left hand side and include anything on that slide that you want to show up on every slide. This is how I added all of the items at the bottom of my presentation slides. 

Keep in mind that you do not need to create this ‘master slide’ ahead of time. You could add items to the master slide at any time and it would automatically add to the presentation.

Google Document:

To make this happen in a Google document, select Footer under the Insert menu. Then you can add links, images, and text anywhere in the footer. Anything you put in the footer of a Google Document will automatically show up on all of the pages.

** Just know that while you create a footer to give yourself credit, this does not stop anyone from making a copy of your presentation or document, deleting it and adding their own name to it. I have a mindset that people will give credit where credit is due.