
This past week, I had the pleasure of participating in a recorded Google Meet roundtable with two colleagues, Jon Greiner (mathematics teacher) and Steph Nichols (humanities teacher). The purpose of the conversation was to talk about how they have been using Jamboard with their students during remote and in-person teaching. From the conversation, one can easily discover that teachers are truly trying to create learning experiences that mimic in person learning as best as possible. From the examples shared, students are encouraged to collaborate with one another remotely. Jamboard has been a great platform to help with this task.
Below are some pro-teacher tips when using Jamboard with your lessons.
Pro-Tip #1
Jon Greiner was asking students to determine if triangles could be formed based on the three side lengths given. Students would drag an example in the chart, followed by dragging the answer. When Jon creates his activities, he always make sure that there are more choices to choose from.
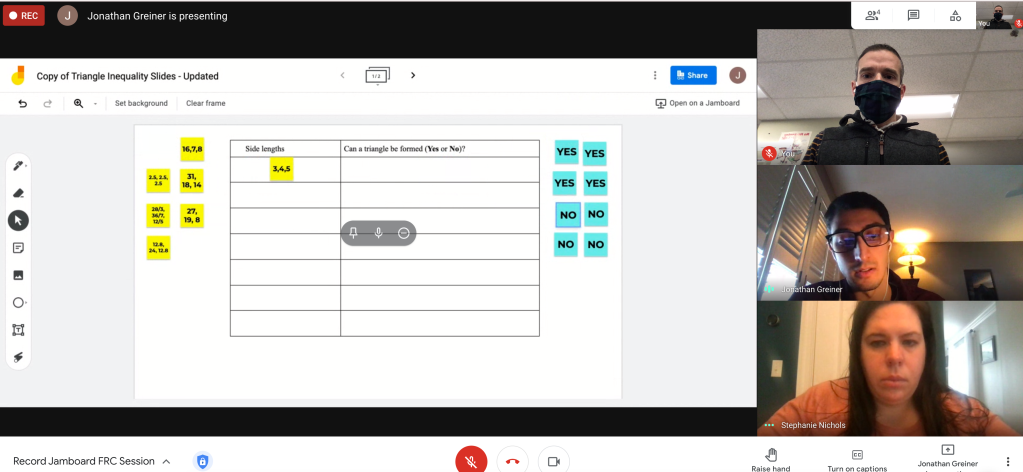
The pro-tip? Create the table in a Google Doc first. Then take the screen shot of that graph and insert the screenshot into the Jamboard with the insert image feature. Jon also customizes the height of each cell to fit the hight of each sticky so that the stickies fit the table.
Pro-Tip #2
Another pro-tip that Jon shared was when he has students in his Geometry class working in groups of two, he asks them to use a different color pen. This way he knows what each student was thinking. Below is an example of partners looking a creating congruent parts based on shapes provided.

Pro-Tip #3
Steph Nichols pro-tip comes into play when providing feedback to students. Steph and her PLC have been using Jamboard to help students annotate readings and comics. As you can see below, the student highlighted areas in the comic and then used sticky notes to explain. Steph asks students to not use the pink sticky as that is the color she uses to provide feedback. This way both the student and the teacher knows when looking at the jam file if any feedback has been provided. Very clever!
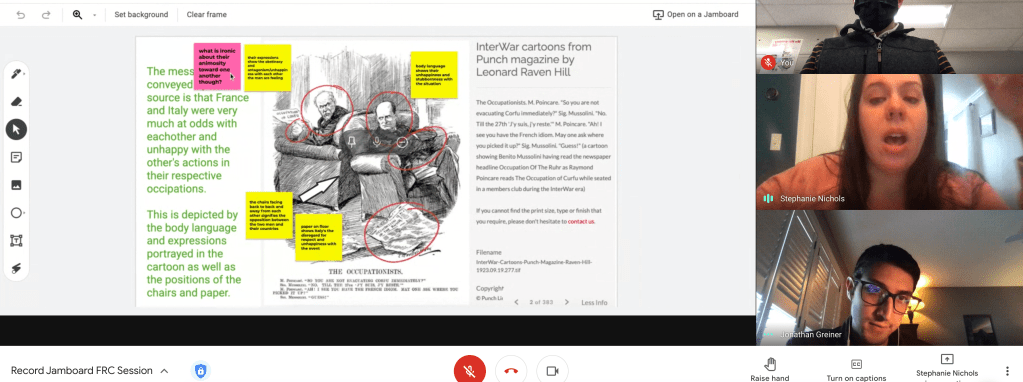
Steph also shared how she and members of her PLC will take screenshots of different artifacts to then import them into the Jamboard so that students can reference them, annotate on top of them or use them as part of web mapping.
Pro-Tip #4
Many teachers are asking students to work in groups remotely through Google Meets. Some teachers are sharing out one Jamboard file to the whole class using the “students can edit” file. Each group is asked to collaboratively work together on one page of the whole class shared Jam file. In other words, group 1 works on page 1, group 2 works on page 2, etc. To save yourself time, make sure the first page of the jam file is the way you want it. Then duplicate that page and make the minor tweaks that need to be made so that you don’t have to replicate everything you already created. To do this, click on the rectangles on the top middle of your screen. You will see all of the pages in the jam file. Click the three dots on the top right corner, and choose duplicate. Do this as many times as the number of groups you have. Then make any small adjustments that need to be made on each page duplicated.

Pro-Tip #5
Anytime you want to create a straight line in Jamboard, use the pen tool but hold down the shift key while drawing. You will notice that your lines will always be straight.
Hope that these few pro-tips are helpful for you. If you have pro-tip yourself, provide it below in the comment section of this blog post. Would love to hear them.
And that is my Spiel…

You probably already know this, but other people can comment on someone else’s sticky note. This is helpful when other students give feedback to each other.
LikeLike