Day 10 of Google: equatIO for Math and Science classes

On day ten of Google, we will take a look at equatIO. Over the past year, I have watching how equatIO is evolving and transforming their product to help make math digital. I am impressed with what I have seen so far.

Let’s face it, showcasing math work electronic can take a bit of time and energy to get your point across. Text help is trying to help solve this with their product equatIO. I can see both math and science teachers embracing this chrome extension.

EquatIO has a chrome extension that you download from the Chromestore (free for teachers). Once downloaded and activated, you are able to

  • type your math
  • speak your thought process/math
  • handwrite your work
You are able to use this extension when you are using G-Suite. (While Google has its own ‘math type’ most do not find it user friendly. EquatIO can be a great solution to getting math equations, expressions and thought process down in a Google product.) When you want to activate it, you select the chrome extension and away you go. I am particularly impressed with the speaking component. Simply by saying, new line, you are able to showcase your math in multiple steps/lines.

You will also notice that equatIO has text prediction so that the moment you start to type ‘quad’ – you can select quadratic formula and the formula will show up without the user having type the entire formula. When you get into the options menu, followed by math options, you are able to turn on math, chemistry, and/or formulas prediction to help save you time.

In the gif below, you will see how to:

  • start using the extension
  • use speech to text
  • insert the math text – you will notice that equatIO inserts the math as an image – if you determine that you made a mistake or you want to change something that you initially made, you select the image in the Google Doc and extract the math so that you can make the necessary change.
This is a very quick overview of the equatIO. If you want to know more about this tool or bounce ideas of how this can be used in your curriculum, please don’t hesitate to ask!
Some of our math teachers are already using the extension. The next step is to see how we can implement this with our students. I hope to write a future blog post on this as well as equatIO new feature equatIO Mathspace. (NOTE: In order for students to be able to use equatIO, students must have a paid account).

And that is my Spiel…

Day 9 of Google: Google Keep Features

On the ninth day of Google, we will explore with Google Keep.

For those of you who have not explored around with Google Keep yet, you are missing out. This tool is now an official G-Suite app and can be found in the waffle icon. Google Keep (keep.google.com) is a tool to help keep you organized.

But, did you know that Keep has a mobile app as well? You can access all of your ‘to do lists’ and reminders on your mobile phone. You can create lists as well as reminders right on your mobile device. Two amazing things that can be done with the help of the mobile device – creating audio files as well as taking pictures to extract text (through the help of OCR).

Audio Recording:

It is very easy to provide an audio recording. Have something on your mind that you don’t want to forget? Find it easier to speak your thoughts? This might be the tool for you.

  • Open up Google Keep on your mobile device (make sure you are logged into your School Google account)
  • Select the microphone icon
  • Record yourself speaking
  • Keep will automatically create an audio file as well as convert what you said into text (it will try to do its best job)
  • You can then copy and paste this information into a Google Doc/Google slide.
  • You can also share your audio recording with others.

Grabbing Image Text:

NOTE: I, by no means am saying that it is ok to steal text/ideas from others. It is always important to keep in mind of what is acceptable and not acceptable. However, there might be a time and place where this could be helpful rather than re-typing information.

  • Open up Google Keep on your mobile device (make sure you are logged into your School Google account)
  • Take a picture of the document
  • Go to Google Keep on your laptop/chromebook
  • Open up the note
  • Select the three dots at the bottom of the note and select ‘Grab Image Text’
  • Text from the document will show up below the picture.
  • Go to Google Docs or Google Slides where you want to use some of the text
  • Under the Tools menu, choose Keep Notepad (notepad will show up on the right side panel. Click and drag text to where you would like it.

And that is my Spiel…

    Day 8 of Google: Chrome Keyboard Shortcuts

    On the eighth day of Google, we will take a look at how to use Chrome more efficiently. Are you someone that uses keyboard shortcuts? I have found that fewer and fewer students actually use a mouse when using chromebooks/computers and knowing basic keyboard shortcuts could help make the user of the device more efficient.

    Chrome Shortcuts:
    Reopen a Closed Tab
    We have all experienced it at some point where we have accidentally closed a tab that we didn’t want to close. Well, did you know that you can get that tab back open with the help of a few key strokes?

    Refresh a Page
    I find myself using the refresh button from time to time. Rather than using the trackpad or a mouse to move the curser to the refresh arrow next to the omni box (search box), there is a shortcut:

    Open and Close a Tab
    Yes, there are also keyboard shortcuts to managing your tabs in chrome.

    In order to make the shift to using keyboard shortcuts, this is something where you will have to ‘force’ yourself into doing it several times before it will become natural.

    And that is my Spiel…

    Day 7 of Google: Google Classroom – Creating to Accessing Student Work

    On the seventh day of Google, we will take a look at Google Classroom.

    To think that teachers once collected student work via a shared document embedded in an email every time they completed something OR by filling out a Google Form to submit work. Google Classroom has been great for being that one central place where students and teachers can easily find necessary documents. But, do you know the following…

    Students ‘Turning In’ Work
    You probably already know that there are two ways that you can create an assignment for students to complete through Google Classroom:

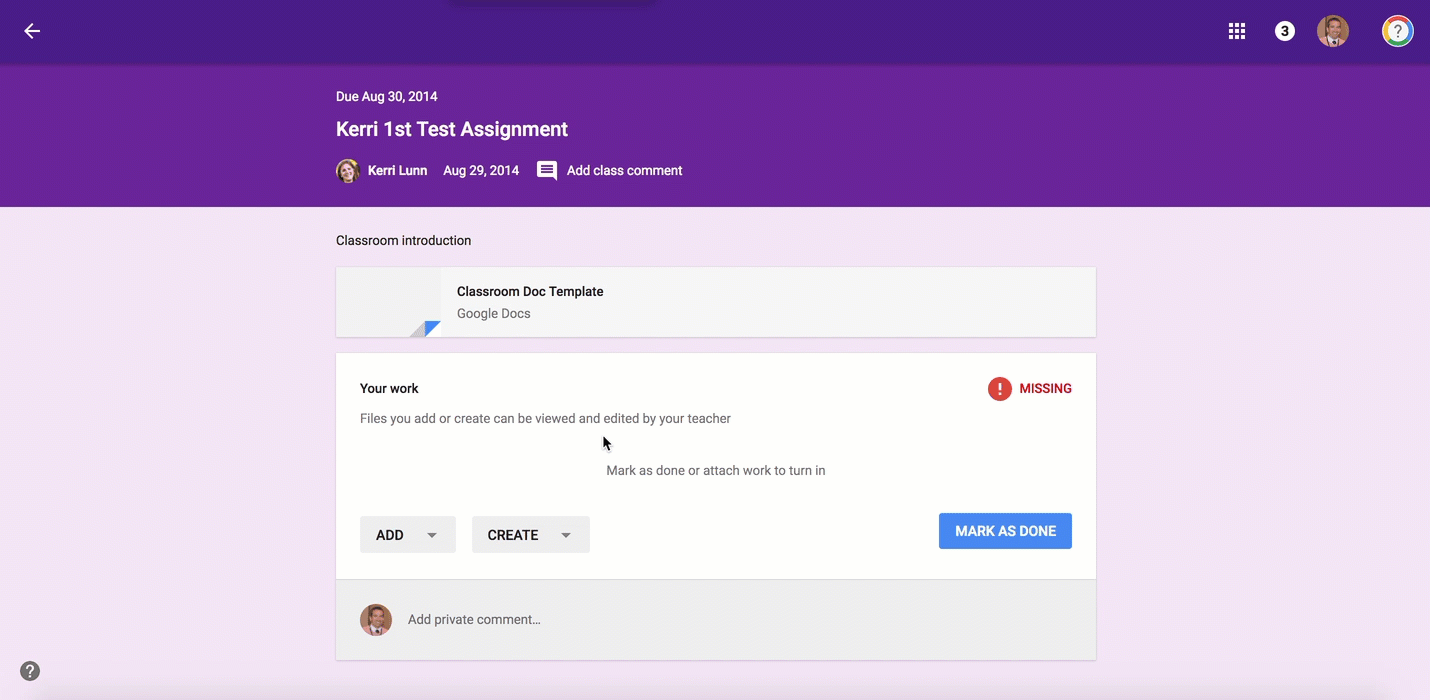
    1. Provide a ‘template’ for student and choosing the ‘Make a Copy for Each Student’ – this method is great so that student get their own electronic copy of a task you want them to complete. This method will automatically name the file for them (with their name in the title). Google Classroom will also provide a ‘Turn In’ button on the top right corner of the Google Doc, Slide, etc for when the student is ready to turn in the assignment. Another great piece to this is that you as the teacher can view what the student is doing with their assignment prior to the due date. This can be very beneficial for situations where you want to provide feedback prior to a due date.

    2. Provide the assignment for the students but do not provide a template. At times, this makes sense to not give a template as you want students to use their own creativity/thought process to demonstrate competency. What many students will do is go to Google Drive and create a new file from there. Then when the assignment is due, they will open up Google Classroom and add their Google Document to the assignment.

    BUT…did you know that there is a more efficient way to make this work? If a student is turning in an assignment to you and the final product will be a Google product, have the students create the file right from the assignment. The advantage to this process is that you as the teacher will be able to see what the student is doing with their work throughout their thought process. Also, a ‘Turn In’ button will then show up in the document. In other words, a similar situation to the one listed in the first example.

    Accessing Student Work
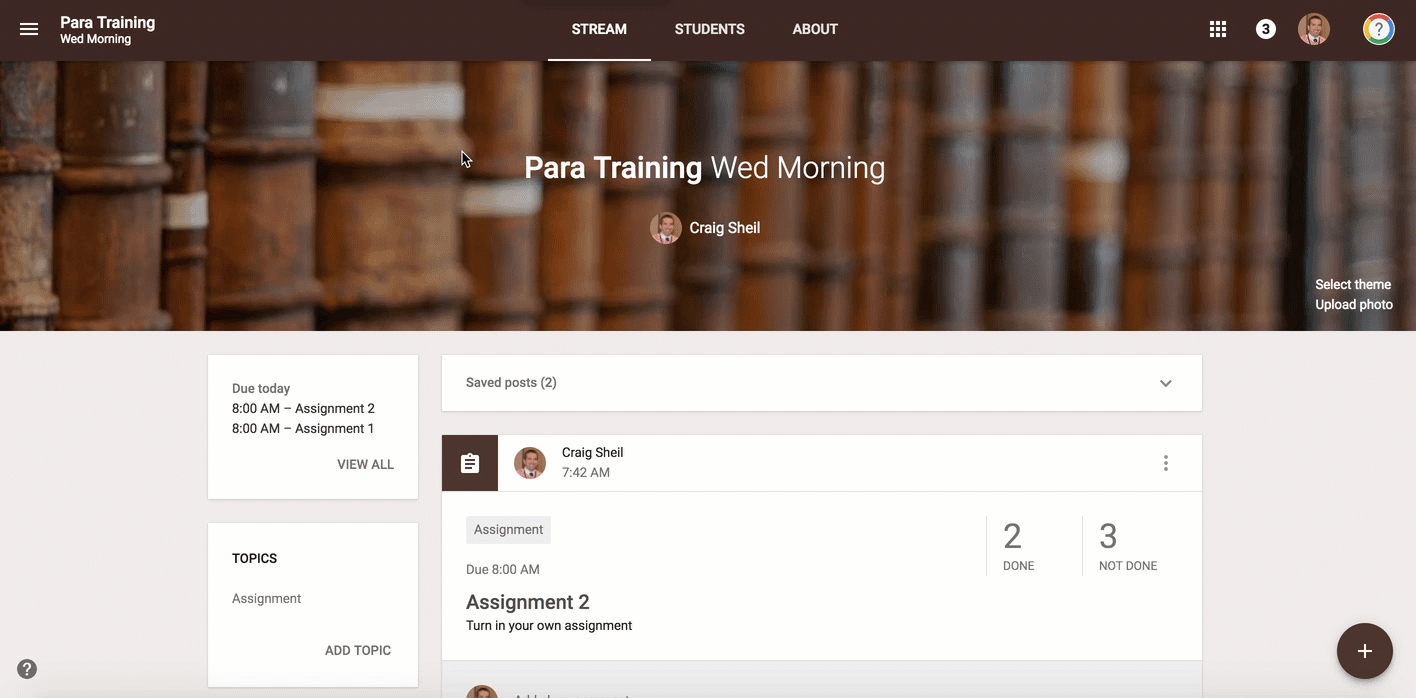
    Did you know you can access all student work for a particular assignment from a folder in your Google Drive.

    • Open up the assignment you want to access student work
    • Click on the assignment folder icon
    • Google Drive will open up in a new tab – right in the folder of student work
    For some staff, they actually prefer seeing the assignments in this view.

    To Do List
    Don’t forget that Google Classroom can also let you know what you have left on your To Do List in regards to reviewing work (if you are a teacher) and completing tasks (if you are a student). If you are a teacher for some classrooms and a student for others, you will have two To Do Lists.

    To find your To Do List, select the ‘Hamburger’ Icon on the top left corner. Then scroll down until you find your To Do List. This can be helpful in letting you know what has to be reviewed from all of your classes in one screen. As make sure that your students are aware that this feature exists for them with the tasks that they have to complete.

    And that is my Spiel…

    Day 6 of Google: Google Drive – Location of Files

    Google Drive (drive.google.com) is the hub of where all your documents live. You are able to create folders and have documents be located in those folders. You are also able to share these files very easily with other colleagues to streamline collaboration. 
    Sure you might have been using this product for some time, but did you know the following:
    File ‘Living’ in Multiple Folders
    You do have the ability for files to live in multiple places in your Google Drive. However, note that by using this feature you are not ‘making a copy’ of a document. Instead you are allowing Google to place a file in two different spots. This will mean that if you make a change to the file from one folder, it will make the change in both places.
    To place the file in two different locations, 
    • Select the file that you want to be located in two different places (only click once – don’t double click)
    • Hit the keys “Shift” and “z”
    • Pop up window will then ask you to determine what folder you want the file to also live in (note – you can create a folder right on the spot as well if you don’t have one already made to add it to)
    • Select the green “Add” button 
    The Green add button is something completely different from what you are used to seeing. Normally we are used to seeing a blue move button. This is so that you clearly know that you are doing something different – you are adding the file to another location.

    File Location While in a Document

    Next to the tile of a file, you will notice that there is a folder icon. If I know that I have not moved this file into a particular folder ahead of time, I could click on the folder icon and actually move it to a particular folder (while inside of the document).  
    Recently, Google made it even easier for you to locate where in Drive a particular file can be found. Whenever you select the tile of the document, Google will let you know where that file is located right next to the folder icon. This is new! You can still move the file if you want to. Just click the folder icon and determine where you want to move it. 
    And that is my Spiel…