How to Make Your Own GIF File

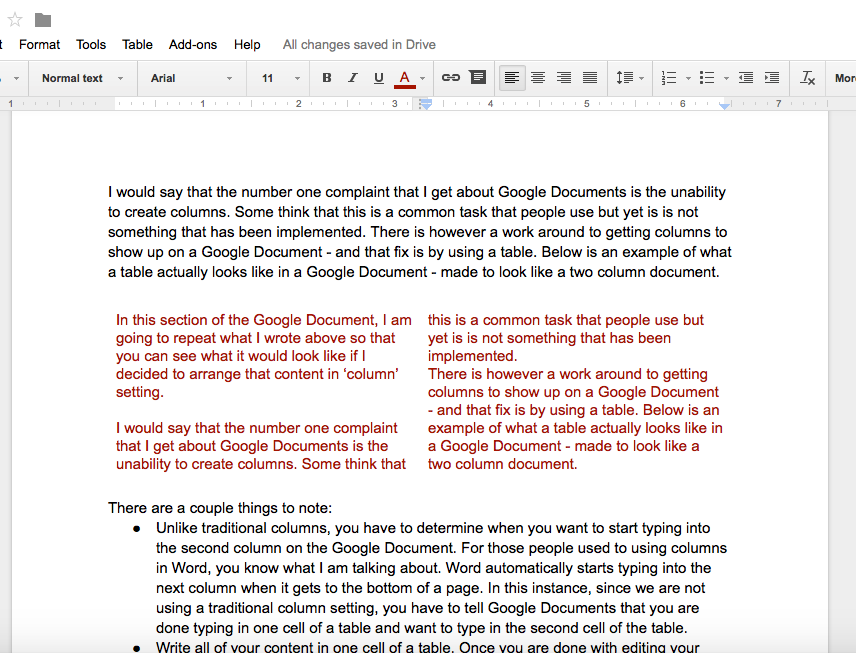
A couple of people have asked me how I have been creating GIF files. It is rather quite simple. For those of you who might be scratching your head as to what a GIF file is, a sample is provided below.

Basically, a GIF file is an animated graphics file (most just think of it as a ‘video’ file). This file extension just plays on repeat. It is great for showcasing a simple task that you want people to follow – but might be easier to explain through animating steps rather than writing the steps out.

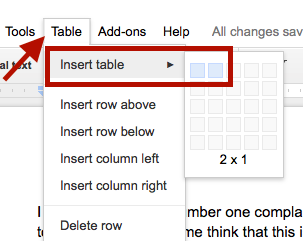
In order to begin, you will need to use the Chrome browser and download Techsmith Snagit (if you don’t already have it). Once it has been downloaded, the Chrome extension will show up on the top right corner of the browser.

Good to Note

There are a couple of things to note with this extension:

  • In order to use this Chrome extension, it will ask you to log into Chrome, if you are not already signed into the browser. 
  • This extension is not just for creating GIF files – you can annotate images as well as take video.
  • Techsmith saves all of your files in a folder that can be found in your Google Drive account. 
  • In order to make a GIF file, it has to be 15 seconds or less (at least I think it does)
Steps for Creating a GIF File
  • Determine what you want to ‘animate’
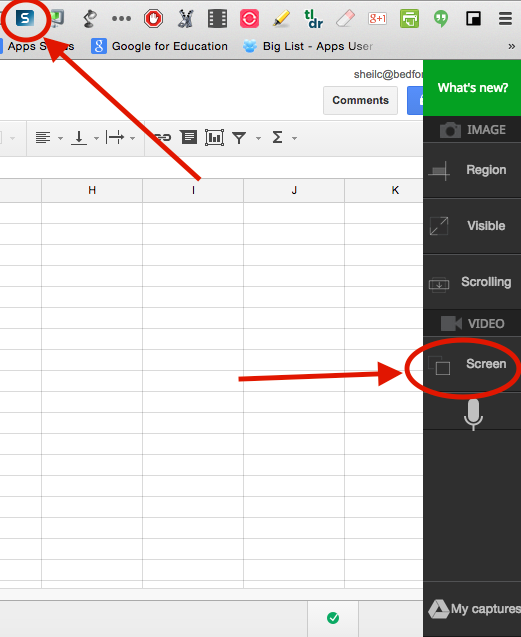
  • When ready, click on the Snagit chrome extension (top right corner of the browser) and select the Screen option.
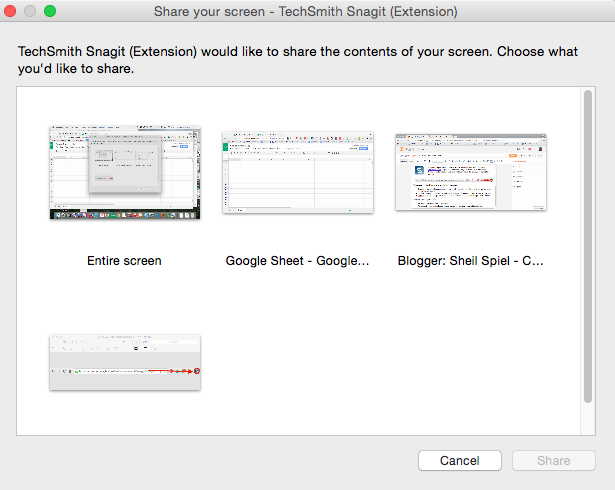
  • Snagit will ask you what you would like to record – based on what is already opened on your computer. Once you select the ‘screen’ you want to record, Snagit will start recording. In the image below, Snagit can record my entire screen, a Google Sheet that I have open, another tab that has my blog, or a file that is opened in Preview.
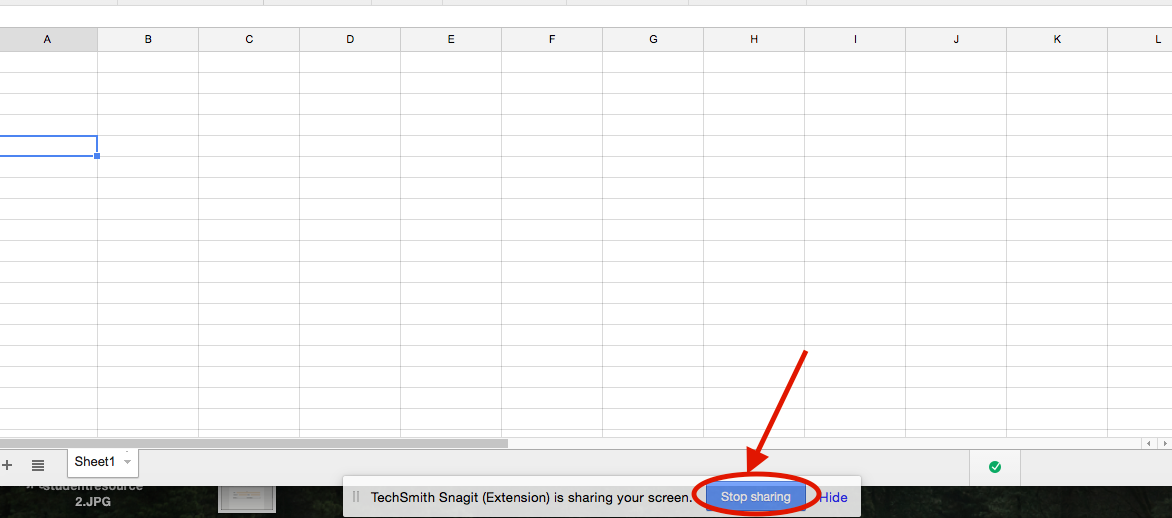
  • Once you are done with your recording, hit the stop sharing button.
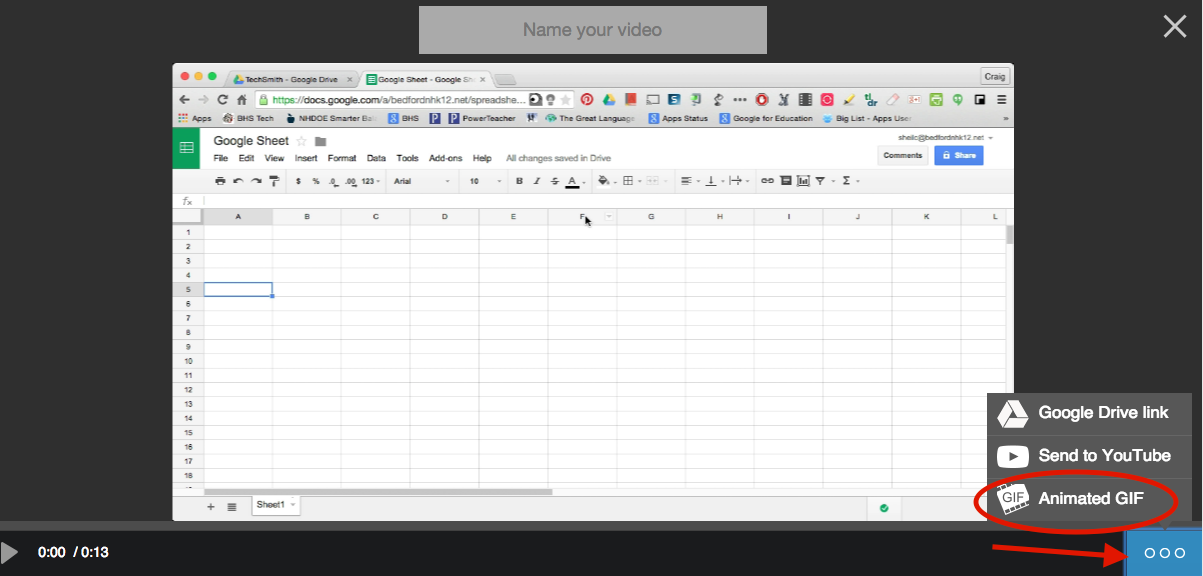
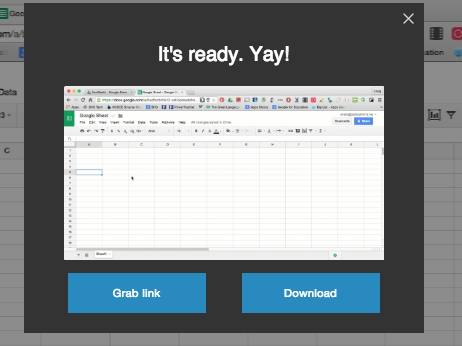
  • Then, name your video at the top of the screen. Next select animated GIF from the menu on the bottom left.
  • Lastly, Snagit will create a link as well as give you the ability to download your GIF file to upload on a website or blog post. Keep in mind that you can access these files right from your Google Drive in the Techsmith folder. (I also like the fact that you can upload video files right to YouTube as well.)

Hope this is helpful.

Creating "Fill In" Responses in Google Docs

Why not have Google Docs work for you…you can turn a Google Document into a ‘fillable form’ by making questionnaires, investigations, worksheets, etc. I know that Google Forms exist and you can ask questions for people to fill out but sometimes, you just do not want your responses to be located in one big Google Sheet.

Where I see this method work great is for investigations or worksheets that students might typically have done with paper and pencil in the past. That is right, students can do the same work electronically, allowing them to ‘turn it in’ through Google Classroom or other electronic collection means.

Examples
Below are some examples of how I see this working out:
1. Questionnaire or Form – wanting to collect basic information from people but need the information separate from others in a document.
2. Investigation or Worksheet – students completing their work electronically in a document – getting away from the traditional paper and pencil method.
Process
There is a little trick to this madness. Follow these steps and you will be golden:
  1. First you must determine the questions that you want to ask. 
  2. Then you must insert tables in your document. This is how you create those text boxes for users to fill out.
  3. Next, you need to customize the look of your tables so that they don’t look like tables. It is also recommended that if you want the responses to have its own style, you will want to customize that as well.
Things to Know/Consider
  • If you are going to use this method for all of your required course work, you will want to be consistent. In other words, keep your response boxes the same color, type of font, etc.
  • When choosing a color for your box, do not choose a dark color. It might be good to just keep it basic and choose a light grey color.
  • Depending on responses – documents may look different. What I mean by this is if a response by a student is extra thoughtful, it will push all content below it – which might result in things showing up on a different page.
Why this Method?
I like this method as students know exactly what is expected of them. There is no confusion for students as they know where a response must be given. There is no room for ‘well I didn’t know I had to answer that’!
Just this year, our administration team had all teachers complete their professional goals and self reflections in an Google Document that was set up as a questionnaire. Again, this allowed teachers to know exactly what they had to fill out and complete.
As always, if you want to learn more as to how you can use this tool in your classroom/curriculum, you know where to find me!

Finding Key Words

We all are in situations from time to time where we are either reading a multi-page Google Document or article on a website and all you want to do is find a particular part. Sometimes skimming takes longer than it would have taken if you just read the article to begin with.

The trick you ask? By using shortcut keys, you can have a search window pop up to locate the word or words that you are looking for.

Shortcut Keys

Mac Users: 

  • command key and f key

Chromebook Users:

  • control key and f key


No matter if you are on the web browsing a website or in a Google Product, a similar window will show up (in the image above) for you to type in the key word you are looking for. In my particular example, the key word Wellness showed up 11 times in this particular Google Sheet. With the help of the arrows next to the key word, you are able to quickly jump through the page to locate the exact thing you are trying to find.

    So You Want to Create Columns in Google Documents?

    I would say that the number one complaint that I get about Google Documents is the unability to create columns. Some think that this is a common task that people use and wonder why it has not been implemented. There is however a work around to getting columns to show up on a Google Document – done by using a table. Below is an example of how a table can actually be made to look like two column section in a Google Document (check out the red text in the Google Document).


    IMPORTANT TO NOTE: Unlike traditional columns, you have to determine when you want to start typing into the second column on the Google Document. For those people used to using columns in Word, you know what I am talking about. Word automatically starts typing into the next column when it gets to the bottom of a page. In this instance, since we are not using a traditional column setting, you have to tell Google Documents that you are done typing in one cell of a table and want to type in the second cell of the table.

    STEPS TO MAKING THIS HAPPEN:

    • Place your cursor where you want to ‘insert columns’. Then select a 2 x 1 table from the Table Menu.

    • Suggestion: Write all of your content in the first cell of the table. Once you are done with editing your content, count the total number of lines and divide it by two. This will then tell you what you need to highlight and copy in the second cell so that the text will line up perfectly. This could become annoying when it comes down to editing your content – but at least you can get your ‘column feel’ when creating columns is not an option in Google Documents. Your table will look something like this:
    • Highlight the entire table and right click. Choose ‘Table Properties’

    • Be sure to change the border color to white so that the borders of the cells no longer show to make the text look like it was never created in a table.

    While this is not a perfect way of making columns happen in Google Documents, at least it gives you a bit more flexibility with how text can appear. Hope this helps!

    Merging PDF Files into 1 PDF

    I was caught in a situation today where I had to merge some PDF files together. I had three PDF files that I had to convert into one PDF file. This was the first time that I had ever had to do such a thing.

    I remembered a coworker, Nicole Cassamassino, telling me about a chrome app called PDF Mergy.  (click on the link to check out the app in the chrome webstore) Basically, you can upload PDF files to the service and it will magically merge them together into one file.

    What I liked about this chrome app is that you can upload PDF files either from your computer or from Google Drive. I also was able to upload a Google Document from my drive (that was not a PDF file) and it converted it to a PDF right away. Once you have uploaded all of your files, you have a choice of having the merged file saved to your computer or to your Google Drive.

    So, if you are interested, here are the steps

    1. Add PDF Mergy app to your Google Drive account  – choose Connect more apps under the Open with drop down menu when you are viewing a PDF in your Google Drive Account.

    2. Go to https://pdfmerge.w69b.com or choose PDF Mergy under the Open With drop down after you connected to your account and are viewing the PDF that you want to merge with another PDF file.

    3. If you access PDF Mergy from Google Drive, it will ask you to connect to your Drive account. (You could also use it without connecting but it will not be able to access PDF files from your Drive – just your computer). This should only prompt you the first time you use the app.

    4. Upload all of your files. Then determine where you would like to merged file to go.

    It was very easy and quick to use! I know that there are many different ways that you can merge PDF files. I only used this one seeing as though it was recommended to me one day.