Merging PDF Files into 1 PDF

I was caught in a situation today where I had to merge some PDF files together. I had three PDF files that I had to convert into one PDF file. This was the first time that I had ever had to do such a thing.

I remembered a coworker, Nicole Cassamassino, telling me about a chrome app called PDF Mergy.  (click on the link to check out the app in the chrome webstore) Basically, you can upload PDF files to the service and it will magically merge them together into one file.

What I liked about this chrome app is that you can upload PDF files either from your computer or from Google Drive. I also was able to upload a Google Document from my drive (that was not a PDF file) and it converted it to a PDF right away. Once you have uploaded all of your files, you have a choice of having the merged file saved to your computer or to your Google Drive.

So, if you are interested, here are the steps

1. Add PDF Mergy app to your Google Drive account  – choose Connect more apps under the Open with drop down menu when you are viewing a PDF in your Google Drive Account.

2. Go to https://pdfmerge.w69b.com or choose PDF Mergy under the Open With drop down after you connected to your account and are viewing the PDF that you want to merge with another PDF file.

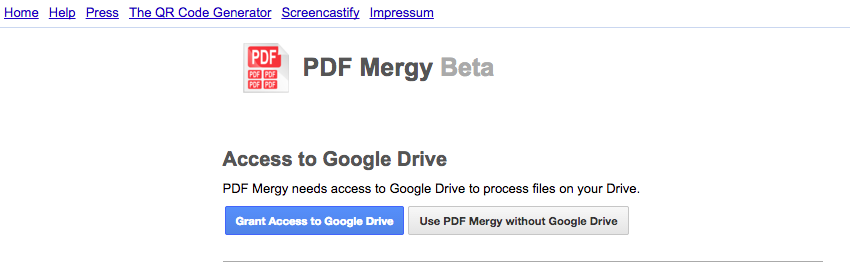
3. If you access PDF Mergy from Google Drive, it will ask you to connect to your Drive account. (You could also use it without connecting but it will not be able to access PDF files from your Drive – just your computer). This should only prompt you the first time you use the app.

4. Upload all of your files. Then determine where you would like to merged file to go.

It was very easy and quick to use! I know that there are many different ways that you can merge PDF files. I only used this one seeing as though it was recommended to me one day.

Creating Your Own Shortcuts For Efficient Grading

More and more teachers are making the switch from requiring students to turn in physical copies of papers to the electronic copy route. I won’t get into which way is the right way to go because lets be honest, there are advantages and disadvantages for both systems. However, with Google creating Google Classroom, lots of teachers have made the switch.

So let’s say that you are a teacher that has about 50 electronic papers waiting for your attention in your Google Drive account. You want a way so that you can still provide meaningful feedback but you don’t want to spend hours doing it.

Here is your solution, create your very own shortcuts! Basically, if you have phrases that you write out a lot – why not create a short cut so that you don’t have to write out all of the words that you want to say. It is very easy to do:

1. Go to preferences under the Tools menu

2. You will notice that Google already has shortcuts created for you. (If you don’t want them, you can delete them.) You are able to create your own shortcuts to make Google more helpful for you. You will notice two empty boxes: ‘Replace’ and ‘With’. Type a short cut in the ‘Replace’ box and write the phrase or sentence that you want to pop up in the ‘With’ box.

For Example:

  • Every time you write wc – you can have Google automatically replace it with Word Choice – think about what you are saying here 
  • Every time you write ro – you can have Google automatically replace it with Run on Sentence
  • Every time you write cit1 – you can have Google automatically replace it with ‘link to a YouTube video demonstrating how to cite a source properly’ 
The possibilities are endless as to what you can include.
Things to Keep in Mind:
  • It is very important that you chose codes that will only be used when you are grading. For instance, you would never want I to be a code for something. If you did, no matter what you were doing in Google, an I would be changed to whatever was placed in the ‘with’ box.
  • Make sure you are in suggestion mode when you are inserting these comments.
  • Once you type the code, just hit the space bar and move on to your next comment.
  • If your codes are very unique to one project/paper, you could always go back into the preference settings and delete the shortcuts you created.
This is just one example of how you can have Google help you provide feedback quickly, but in a meaningful way. (A big thanks goes to Karen Desjadon @kdesjadon for demonstrating this to me.)

Google Keep – Great Way to Stay Organized!

Just recently, a staff member (Sue Reilly) shared a tool that she has been using, Google Keep. This is a great tool for those people who LOVE sticky notes. These sticky notes are virtual however and can be accessed anytime you are logged into your Google Account. And, this tool is WAY BETTER than the tasks list that is built into GMail. Trust me on this one!

Oh and the best part you might ask? You can create SHARED stickies with other people so that task lists can be edited in real time collaboratively. In other words, you can have a task list with a co-worker while another sticky is not shared with anyone.

Below is an example of what my Google Keep looks like. The Green Sticky is shared with two other people, the Blue Sticky is not share with anyone, and the Red Sticky is shared with one other person.

Other Features of Google Keep

  • Stickies can be different colors to help differentiate between tasks
  • Stickies can either be notes or task list
  • Items can be deleted from a list once you have completed it
  • Reminders can be set on stickies so that you don’t forget about them
  • Stickies can be archived when you are done with them
Most of these features can be found by hovering over a sticky (as can be seen from the sticky on the left)

So, if you want to get rid of the stickies that are attached to the edge of your computer or on your desk – it is time for you to try this tool out. Go to keep.google.com and start exploring the possibilities.

Using a Footnote for Branding Purposes

Why not give yourself credit where credit is due! Many people only use a footnote for when they are writing papers and need to cite sources. I tend to use a footnote anytime I create documentation whether I am in a Google Document or a Google Slide.

Ways of using a footnote in your documentation/instructions/presentations:

  • class hashtag
  • class/teacher twitter account
  • class mascot image
  • school logo
The possibilities are endless.

Google Slide:
Below is an example of what my ‘footers’ look like on a Google Slide. I tend to always include my Google profile picture (that will link to my Google+ account), a link to my Twitter account, as well as  my tech hashtag. You will also on the far right I have a picture of the BHS tech logo.

To make this happen for every slide automatically, select Master under the View Menu.

Be sure to select the Master slide on the left hand side and include anything on that slide that you want to show up on every slide. This is how I added all of the items at the bottom of my presentation slides. 

Keep in mind that you do not need to create this ‘master slide’ ahead of time. You could add items to the master slide at any time and it would automatically add to the presentation.

Google Document:

To make this happen in a Google document, select Footer under the Insert menu. Then you can add links, images, and text anywhere in the footer. Anything you put in the footer of a Google Document will automatically show up on all of the pages.

** Just know that while you create a footer to give yourself credit, this does not stop anyone from making a copy of your presentation or document, deleting it and adding their own name to it. I have a mindset that people will give credit where credit is due.

Moving Email Addresses in an Email

GMail allows you to easily move an email address that was placed in the wrong spot while composing an email.

In other words, lets say you placed two emails in the To: section but really needed one of those email address in the Cc: (carbon copy section). To fix this issue, all you need to do is click on the email address and drag it to the appropriate section.

Just another way Google makes things easy for us.