YouTube Videos and New Settings in Google Slides

This post reminds me of how important it is to continue to learn and grow. Just when you think you might know everything there is to know about a tool, you discover that is not the case.

Google has made some changes recently with Google Slides. I really had not appreciated the change until it became beneficial to me last night. I had seen/read that Google included a video setting for YouTube videos that are included in a Google Slide but never realized to the extent of the features.

Continue reading “YouTube Videos and New Settings in Google Slides”

Day 12 of Google: Creating Your own GIF with AutoDraw, Photos, and Slides

For day twelve of Google, we are going to look at how AutoDraw, Google Photos and Google Slides can be used to help create your own GIF for a presentation.

GIF files and bitmojis have appeared in text messages/group chats for awhile now. I am noticing that more and more people are including these in presentations now. In most cases, gifs that are used are ones that have been found online. Well, with the help of three applications, you can create your own GIF. What makes this process even easier is the fact that Google Photos is now an option for inserting images into a Google Slide presentation.

Below is an example of something that was created in AutoDraw, uploaded into Google Photos to create a ‘GIF’. This file can then be inserted into any location that allows for images. Below will walk you through the process…

Step 1: AutoDraw
I have written an earlier blog post on Google AutoDraw. AutoDraw is a great way for students to create their own visual with the help of artificial intelligence. I for one am not a great drawer. I can use all the help that I can get with my drawings. This is also a great way to get ‘free to use’ images.

  • Create what you want to turn into a GIF. My example will be a basketball moving as if it is being thrown in the air. 
  • After my image is all set, take a screenshot
  • Move items that you ‘drew’ (in my case, I will move the basketball)
  • Take another screenshot
  • Repeat step 3 and 4 until you have all the necessary screenshots 

Step 2: Google Photos

Next, we will use Google Photos (photos.google.com). The reason behind this is so that it will automatically create the GIF for us. Google Photos calls this an animation.

  • Once in Google Photos, choose upload on the top right corner
  • Upload all of the screenshots (or images you want to eventually make into a GIF file)
  • On top right corner, select the plus button and choose animation
  • Select all images you want to be part of the gif ‘animation’

Step 3: Google Slides (or Docs, Drawing)

Next, you will want to open the application that the GIF file should be placed – in this case Google Slides. With Googles latest feature, it is even easier to add images.

  • Open up Google Slide presentation
  • Go to slide you want the image to be located on
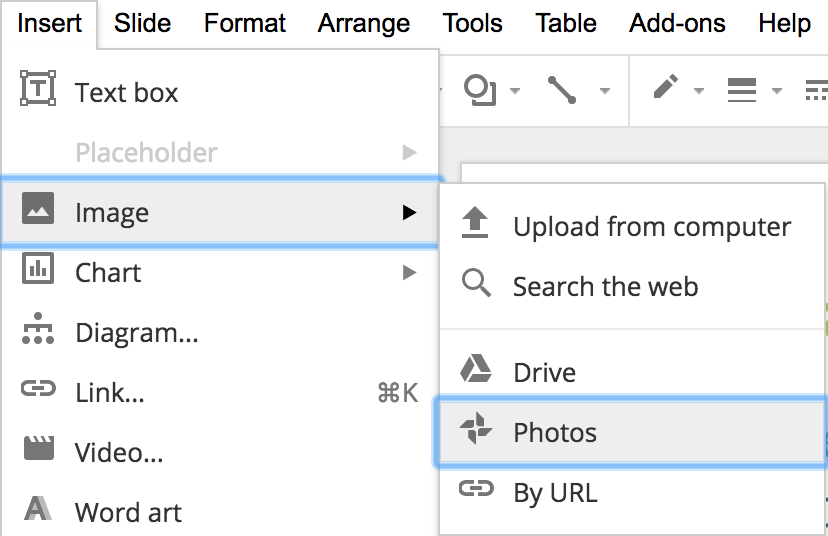
  • Under the insert menu, choose Image followed by Photos. Google will search your Google Photos and you will select your GIF file.
And that is my Spiel…

Day 2 of Google: The Many ‘Different Views’ of Google Slides

On the second day of Google…

We are going to take a look at some view features of Google Slides.

Forcing Present Mode
Let’s face it, if you are using G-Suite you have shared a link to document in your Drive. Assuming sharing permissions have already been handled so that those that can view are able to view (anyone with the link), you can actually force present mode on a Google Slide presentation. Sometimes, you might not want people to be able to see the slides along the left side of your Google Slides. The traditional way many people would share a link outside of Google Classroom is to copy the link from the omni box (the search box in Chrome). Then share out the link via email etc.

Instead, you have the ability to share the presentation so that they only see the final slides and not the edited side of Google Slides. How might you ask? Go to the omni box – where the link is for the presentation. Follow these steps:

  • Move your cursor all the way to the right until you see the word ‘edit’ in the URL.
  • You will want to delete the word ‘edit’ and anything else to the right of the word ‘edit’. 
  • Replace what you deleted with the word ‘present’.
  • Copy your new link and provide this with those that you want to have access to. NOTE: Sometimes, I will paste the new link in a different tab and shorten it so that people can very quickly get to the presentation in present mode.

Looping Through Slides

You have the ability to loop through a Slide presentation without clicking through the presentation or restarting the presentation when it is done. This can be great for evening community events or photo slideshows.

Follow these steps:

  • Change share permissions to ‘Anyone with the Link’
  • Choose ‘Publish to the Web’ under File Menu
  • Determine how long you want each slide to show
  • Determine if you want the presentation to restart when it gets to the end and if you want the presentation to start right away when page loads
  • Select Publish button
  • Copy the link from the pop up window (this is the link that you will use for looping the presentation)

Viewing Slides in Edit Mode

Recently, Slides received an update where you could view your slides beyond the left side bar. You can actually have them show up in block mode on the entire screen. This way you can see the layout of the slides a bit better and easily move slides around. Just double click on a slide to get back into editing it.

How to make this happen? Select the block icon on the bottom left (under all of the slides).

And that is my Spiel…

Google Slides – Using Drawing Features

This week, I was invited to attend Sophomore Humanities classes showing students how they can use Google Slides to help create a collaborative children’s digital story book.  Most people are very comfortable with doing the ‘basics’ when it comes to Google Slides – add some text and images. In the Google Slide presentation below, you will find tips on how to change the page height and width of the slide presentation as well as using some of the drawing features in Google Slides.

Check it out for yourself…did you know you could do the following in Google Slides?

NOTE: You might be asking, why not just use Google Drawings for the draw features. You most certainly can do that however the big difference with Google Drawings is the number of pages. You are only allowed one Google Drawing page, while you have the ability to add multiple pages in Google Slides.