Using & Sharing G-Suite Templates

Let’s face it…there are times where you are not interested in creating something from scratch or you do not want your students to have to either. You just want to be able to use a template that has already been made. Why reinvent the wheel? Well, Google Drive has some templates that you can choose from. The question you might ask is, “Well, how can I find templates for docs, slides, forms, etc.”
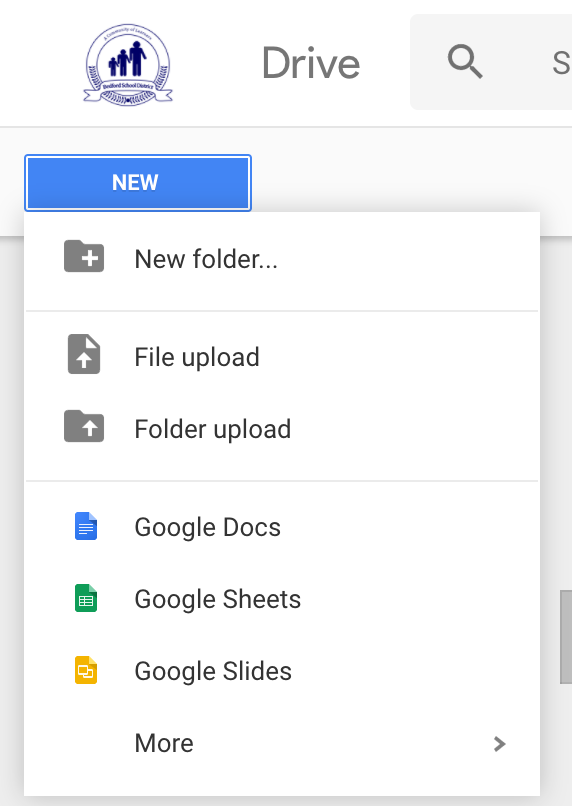
If you are in the Google Drive tab, you will notice that when you go to create a new document, by selecting the new button, you are not prompted with an option to create a document from a template.

Instead, you will want to actually be on the landing page of the type of file that you are looking to use a template. For example, if you are looking for students to compose a letter or write newsletter for an assignment, you might have them go to the landing page of Google Docs (docs.google.com) OR select the docs icon in the top right waffle icon.

By doing this, not only will you find Google Docs that you have in your drive, you will also find some templates that have already been created for anyone to use and alter. Even if you do not like what is provided, the templates will give you an idea of how one has created them. This might give you some inspiration on how you can design some of your files moving forward. This might also give you some inspiration to share your own templates with your school domain.

Finding a Template

One row of templates are located at the top.
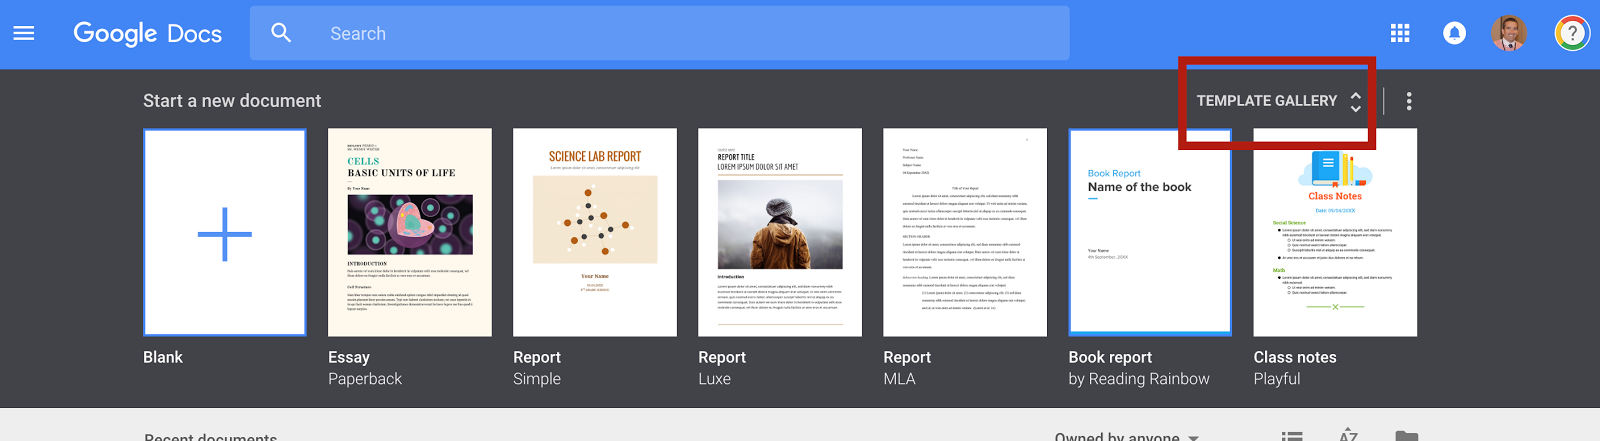
By selecting the word TEMPLATE GALLERY, you will find more options to choose from.
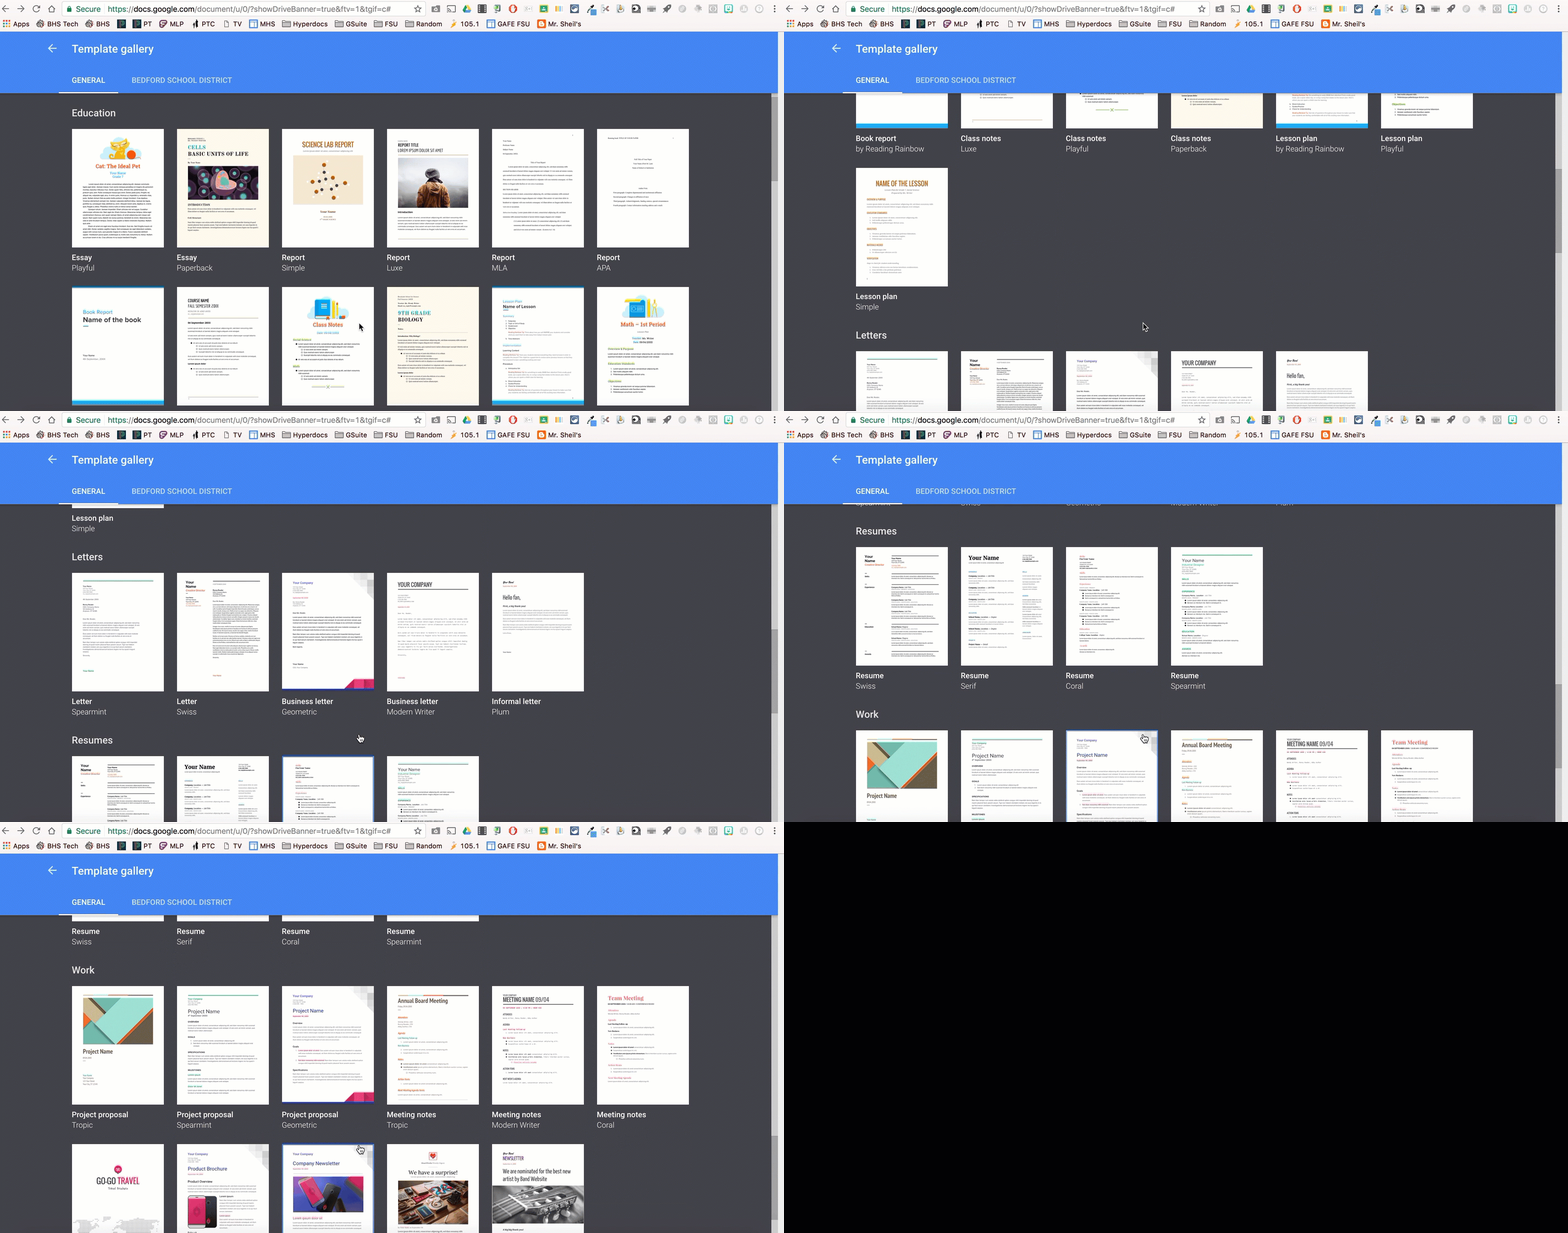
Select the one that you are interested in and away you go.

Providing a Template for Your School Domain
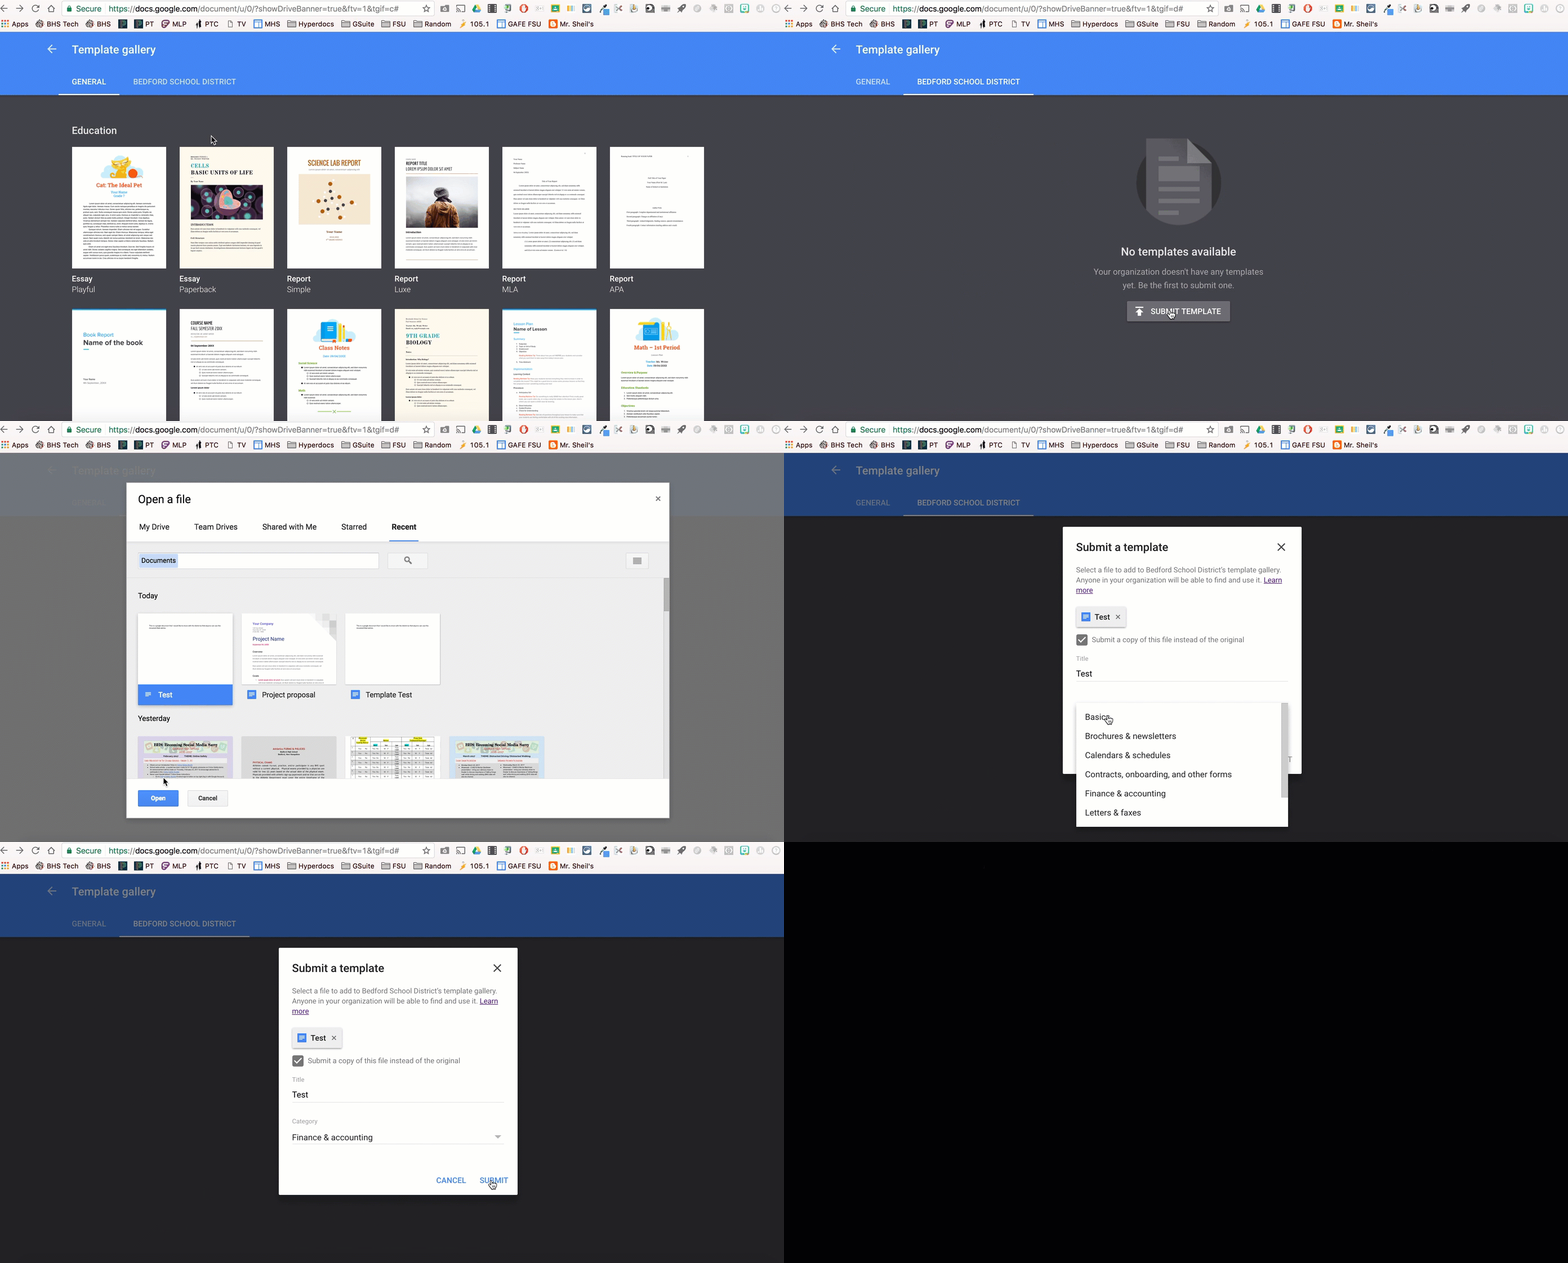
You have the ability to add a template for your school domain as well. Once you are in the template gallery, select your school district tab. Then follow the steps to submitting a template.
Recommended Templates for Teachers

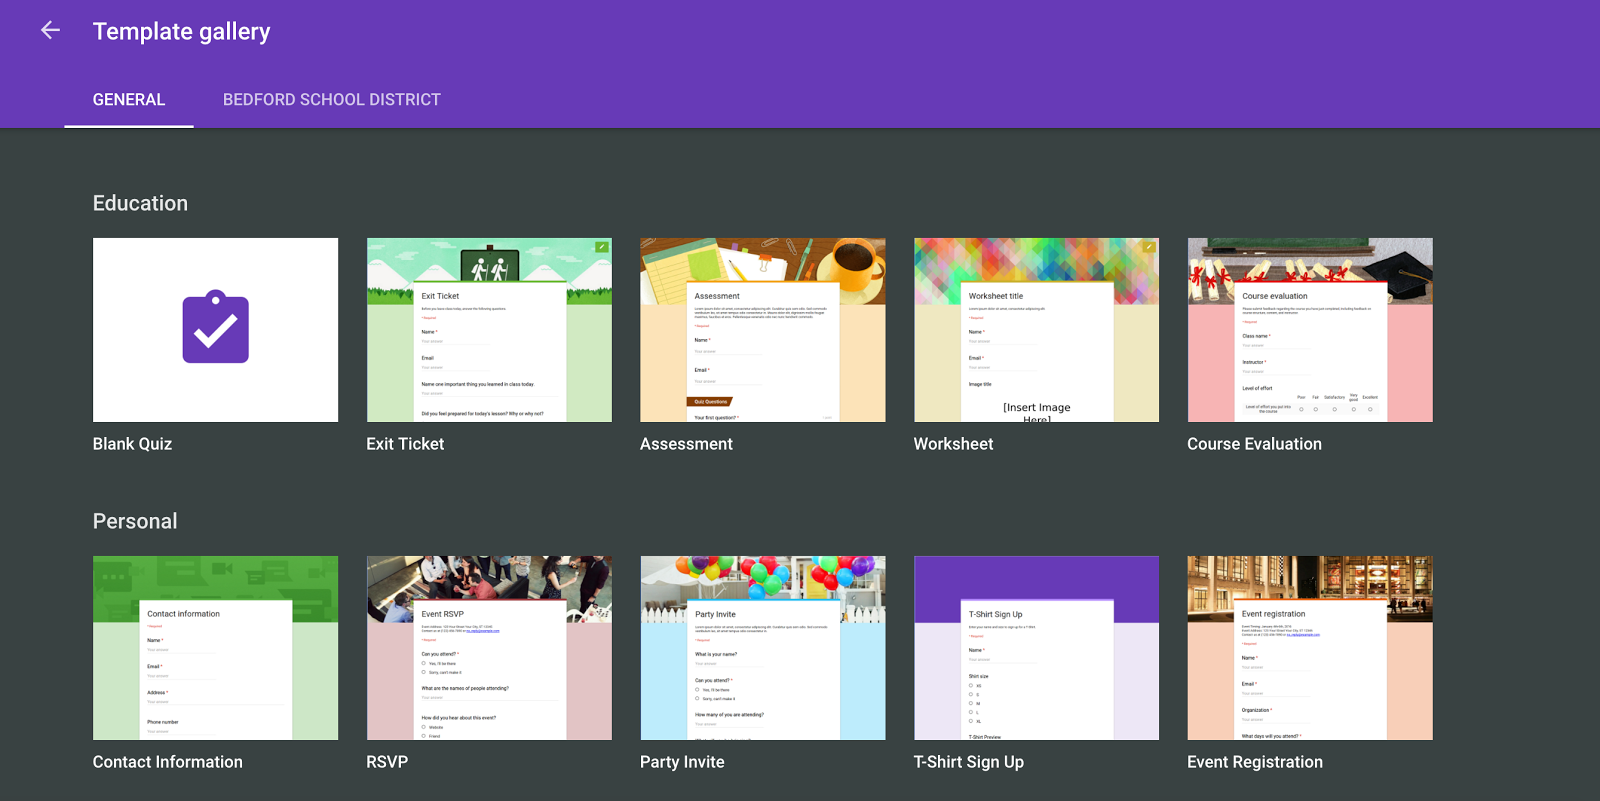
Google Forms has a couple of templates that can help teachers get started: Exit Ticket and Course Evaluation.
Of course, if you have any questions, you know where to find me.

And that is my Spiel…
Efficiency with Using Multiple Tabs in Chrome

Sometimes the ‘simplest things’ are the ‘best things’. One such example has to deal with managing your chrome tabs and windows. We all have experienced a time where we wanted to be able to see two different tabs in a chrome browser at the same time, but we don’t want to have to deal with bouncing back and forth from each of them to accomplish work. You also don’t want to have to manually select new window from the file menu of Chrome. So the solution you ask? Use two different chrome extensions, called Tab Scissors and Tab Glue.

Tab Scissors
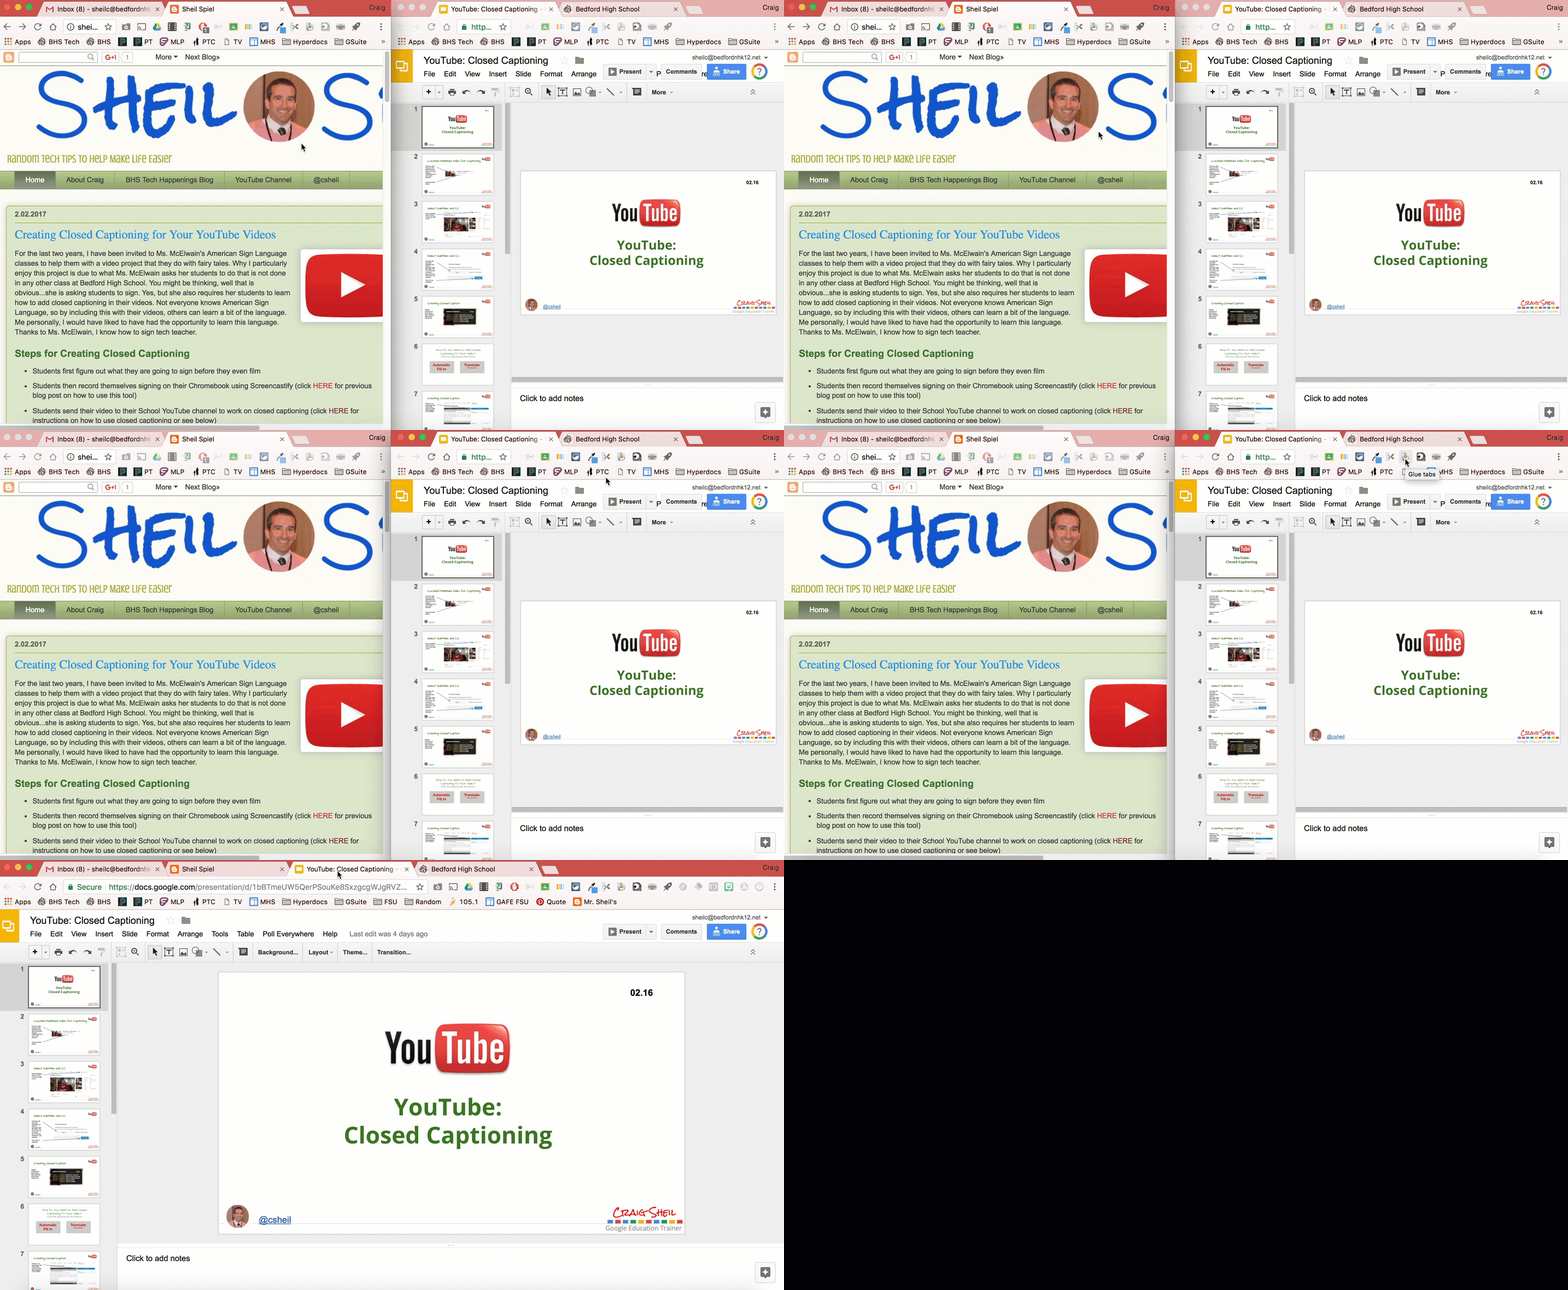
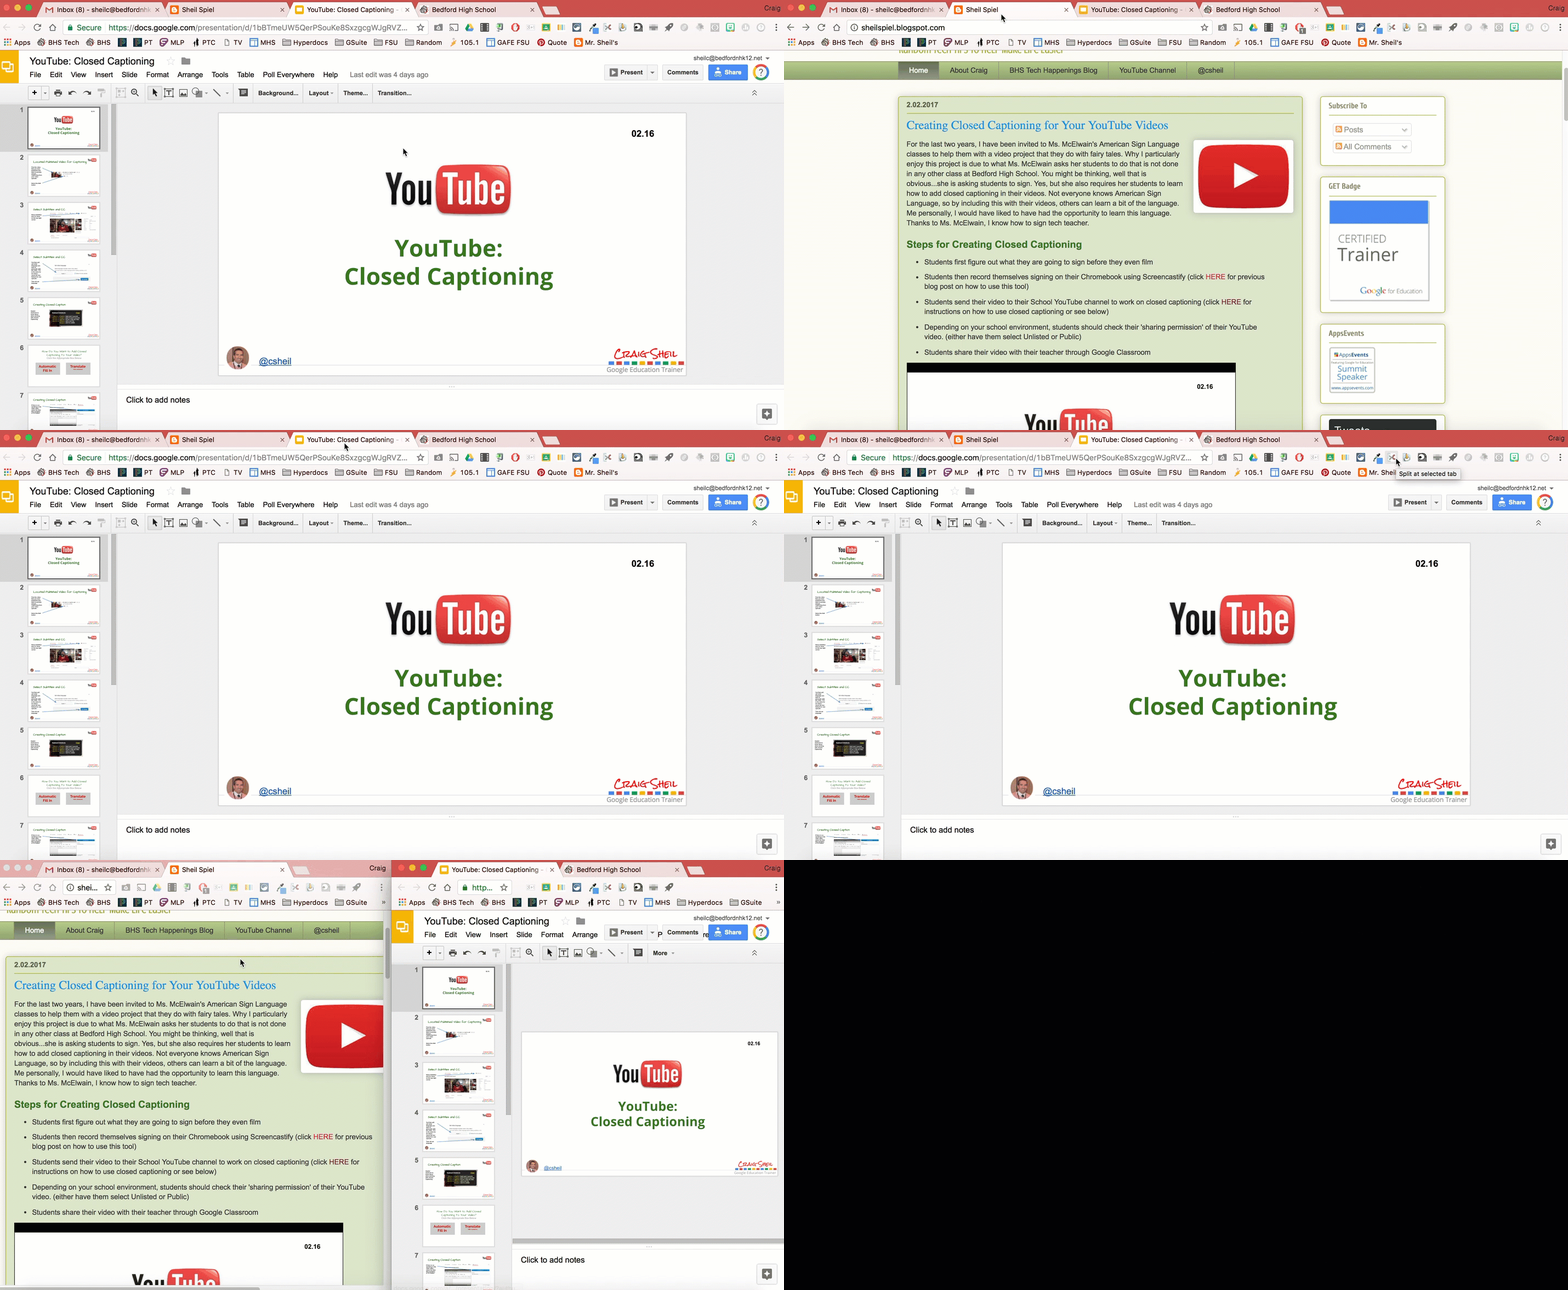
You can get tab scissors from the chrome store, under the extensions section. By selecting this chrome extension, it will automatically create two different windows for you.

NOTE:
1. The two separated windows will take the same real estate as the original window. Thus you will want to make sure that the original window takes up the full screen of your computer.

2. You will notice in the GIF below, I want to be able to see the Sheil Spiel tab as well as the YouTube: Closed Captioning Google Slide presentation tab. Thus, because the Google Slide is the tab on the right side, I selected its tab before hitting the Tab Scissors chrome extension.


Tab Glue
You can get tab glue from the chrome store, under the extensions section. When you are ready to merge the two chrome windows back into one, you select the tab glue extension. See the GIF below.

Hope that this simple tech tip can help make you be more efficient with your work.

And that is my Spiel…

Creating Closed Captioning for Your YouTube Videos

For the last two years, I have been invited to Ms. McElwain’s American Sign Language classes to help them with a video project that they do with fairy tales. Why I particularly enjoy this project is due to what Ms. McElwain asks her students to do that is not done in any other class at Bedford High School. You might be thinking, well that is obvious…she is asking students to sign. Yes, but she also requires her students to learn how to add closed captioning in their videos. Not everyone knows American Sign Language, so by including this with their videos, others can learn a bit of the language. Me personally, I would have liked to have had the opportunity to learn this language. Thanks to Ms. McElwain, I know how to sign tech teacher.

Steps for Creating Closed Captioning

  • Students first figure out what they are going to sign before they even film
  • Students then record themselves signing on their Chromebook using Screencastify (click HERE for previous blog post on how to use this tool)
  • Students send their video to their School YouTube channel to work on closed captioning (click HERE for instructions on how to use closed captioning or see below)
  • Depending on your school environment, students should check their ‘sharing permission’ of their YouTube video. (either have them select Unlisted or Public)
  • Students share their video with their teacher through Google Classroom


Watching Any YouTube Video
Whenever you watch a YouTube video, you can activate Closed Captioning on the Video by selecting the CC box at the bottom right of the YouTube video. Closed Captioning will then appear.

*NOTE: For the video in the image below, I did not actually work on the Closed Captioning even though it was a video that I screencasted. YouTube is making its best guess on what is being stated. Thus, there might be some errors in what is being stated verbally versus being shown through text.

If you would like to learn more on how you can implement this feature with your curriculum and students, you know where to find me.

And that is my spiel…

Electronic Verbal Feedback w/ Read & Write

Last month, a colleague of mine, Donna Dennis shared with me an efficient way for a teacher to give electronic verbal feedback on student work. She was introduced to this idea at the Christa McAuliffe Tech Conference, I think it came from Jenn Judkins. I thought it was a very clever idea and wanted to share.

Instructions on how to get things set up and actually record comments can be found below in the Google Drawing below. However, in order to access the links provided in the Google Drawing, you will want to click HERE. In order to use this process, you must be using Chrome as well as the Read & Write chrome extension.

What I appreciate most about this process is that students do not need access to a separate account (through an add on, chrome extension, or google app). Only the teacher needs access to Read & Write to leave electronic verbal comments in a students’ Google Document. I also appreciate the fact that Read & Write will give an educator a free account if they do not currently have an account. Not only is the process extremely simple, it also forces the teacher to provide quick, short feedback as the default to voice comments is a minute or less. Just as we ask our students to think about their thoughts, it forces teachers to also do the same.

NOTE:
All voice comments that you leave can be found in a folder in your drive called “My Voice Notes”. Read & Write organizes these all for you.

When a student wants to play a recorded comment, they select the link provided and listen to the comment in a separate window.

Of course, if you have any questions or want me to work with you to get things set up, you know where to find me.

And that is my spiel…

Supporting Students through Appointment Slots

A year ago, I wrote a blog post on how you could set up appointment slots in Google Calendar for people to sign up to reserve a time. This is a helpful process as it automatically shows up in your calendar. This feature can be used for many purposes, such as student conferencing and/or presentation time slots.

Well this year, I have a follow up to that blog post. This year, a humanities team decided to give their students an opportunity to choose what they wanted to learn, during a particular unit, and showcase to the rest of the class. Of course there were parameters as the learning had to be tied to an essential question.
Krystin Cooney and Jess Hatzidakis asked both the librarian (Jess Gilcreast) and I if we would be willing to help out their students when it came time for researching and finding the ‘right’ tool to showcase their work. Of course, we said yes! They clearly stated that they were not looking for Gilcreast and I to put together a presentation to the whole class. Instead, they wanted students to sign up for a time slot to meet with either of us to talk more specifics about their project. To be honest, Gilcreast and I thought that this was brilliant, especially since students had choice in what and how they were presenting to the class. Both the students and Gilcreast and I got more out of the conversation than if we spoke in front of the whole class. This is something that I hope to continue doing in the near future for other classes.
Process for Creating Appointment Slots
  • Krystin and Jess sent Gilcreast and I a couple of dates to choose from to be available to come into class. Gilcreast attended class a week prior to me seeing as though she was helping the students with research questions. I showed up the following week to help answer questions on putting ideas together.
  • Jess Hatzidakis then created the appointment slots for students to choose from. Want instructions on how to do this? CLICK HERE These appointment slots were created under her account. We had talked about how Jess Gilcreast and I could each create our own appointment slots but the teachers wanted to make it easier for the students to sign up and only have to look through one calendar. – Very smart thinking on her part!
  • Once a student signed up for a time slot, Jess Hatzidakis went into the calendar event and added either Gilcreast or myself to the appointment, depending on whether it was for research or type of tool question. I would then accept the invite and it showed up in my own calendar. The nice thing about appointment slots is that Google automatically adds the person who is requesting the time slot to the title. Very handy!
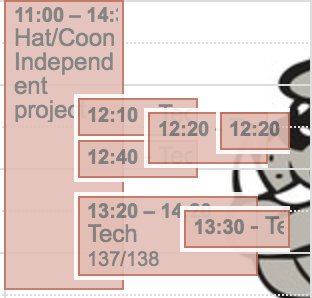
This image shows what my calendar looked like from students signing up. I just marked off in my calendar to be available from 11:00 – 2:30 for my own purposes. You will notice I had a meeting with 4 different student groups (12:10pm, 12:20 pm, 12:40 pm and 1:30 pm). I choose this mode so that you did not see student names associated to the calendar. This method was great as I knew exactly who I was helping prior to going to the classroom.
If you have any questions on how you can use this method in your classes, you know where to find me.
And that is my spiel…