Day 3 of Google: Exploring with Google Trends

On the third day of Google, we will explore Google Trends…

Google Trends (trends.google.com) is relatively new to me and I have not explored all of its capabilities yet, however I do see the value with this tool. I feel as though Google Trends could be applied to different curriculum.

Once you get to the website, you will notice that Google provides featured items as well as stories that are trending on that particular day. As I write this blog post (Thursday, Dec 7, 2017), I am seeing Alabama Senate seat info, Holiday shopping, Grammy Awards, and National Pear Harbor Remembrance Day.

When we first explored with Google Trends, the Tuesday prior to Thanksgiving, we were diving deep into Thanksgiving. This is what we discovered, Thanksgiving 2017. It was cool to see things like:

  • top searched pies by state
  • top searched Thanksgiving recipes
  • top searched Thanksgiving questioning
  • searches for Friendsgiving (on the rise)
You can either look at what is trending or you can search your for specific content. 
I can see some interesting conversations coming out of searching trends. NOTE: Data changes from one day to the next due to what is trending – thus you might see different results from the last time you looked at a particular topic.
And that is my Spiel…

Day 2 of Google: The Many ‘Different Views’ of Google Slides

On the second day of Google…

We are going to take a look at some view features of Google Slides.

Forcing Present Mode
Let’s face it, if you are using G-Suite you have shared a link to document in your Drive. Assuming sharing permissions have already been handled so that those that can view are able to view (anyone with the link), you can actually force present mode on a Google Slide presentation. Sometimes, you might not want people to be able to see the slides along the left side of your Google Slides. The traditional way many people would share a link outside of Google Classroom is to copy the link from the omni box (the search box in Chrome). Then share out the link via email etc.

Instead, you have the ability to share the presentation so that they only see the final slides and not the edited side of Google Slides. How might you ask? Go to the omni box – where the link is for the presentation. Follow these steps:

  • Move your cursor all the way to the right until you see the word ‘edit’ in the URL.
  • You will want to delete the word ‘edit’ and anything else to the right of the word ‘edit’. 
  • Replace what you deleted with the word ‘present’.
  • Copy your new link and provide this with those that you want to have access to. NOTE: Sometimes, I will paste the new link in a different tab and shorten it so that people can very quickly get to the presentation in present mode.

Looping Through Slides

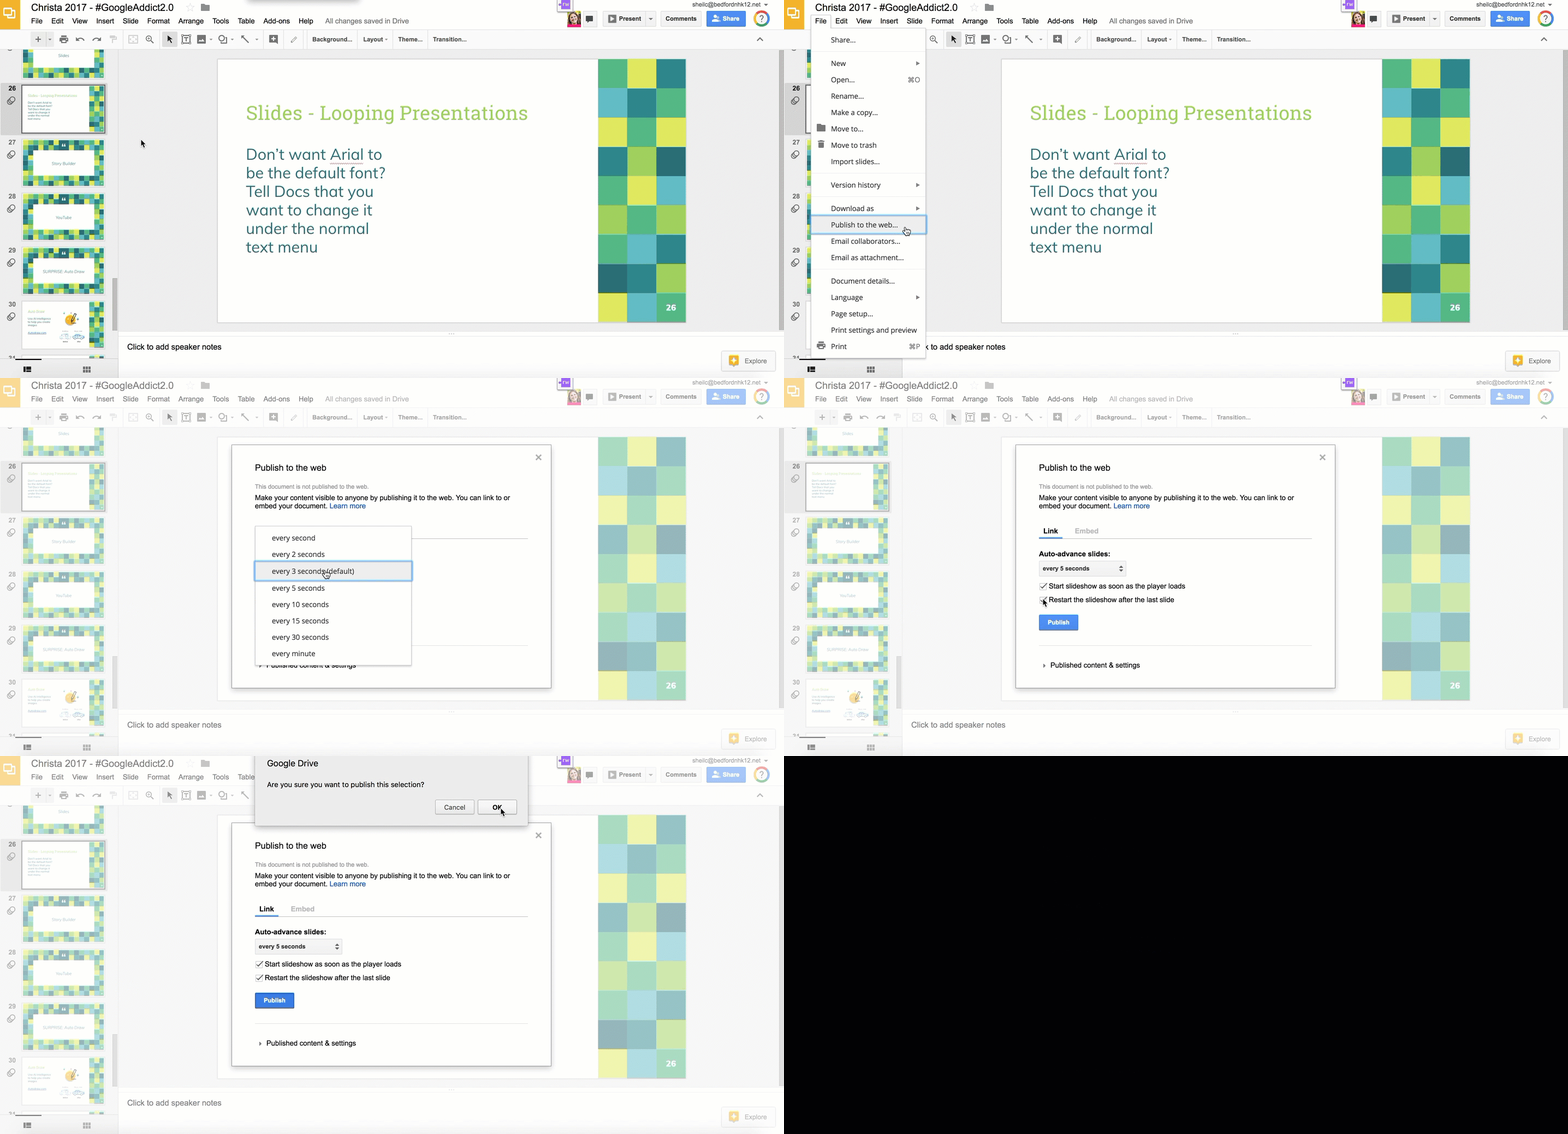
You have the ability to loop through a Slide presentation without clicking through the presentation or restarting the presentation when it is done. This can be great for evening community events or photo slideshows.

Follow these steps:

  • Change share permissions to ‘Anyone with the Link’
  • Choose ‘Publish to the Web’ under File Menu
  • Determine how long you want each slide to show
  • Determine if you want the presentation to restart when it gets to the end and if you want the presentation to start right away when page loads
  • Select Publish button
  • Copy the link from the pop up window (this is the link that you will use for looping the presentation)

Viewing Slides in Edit Mode

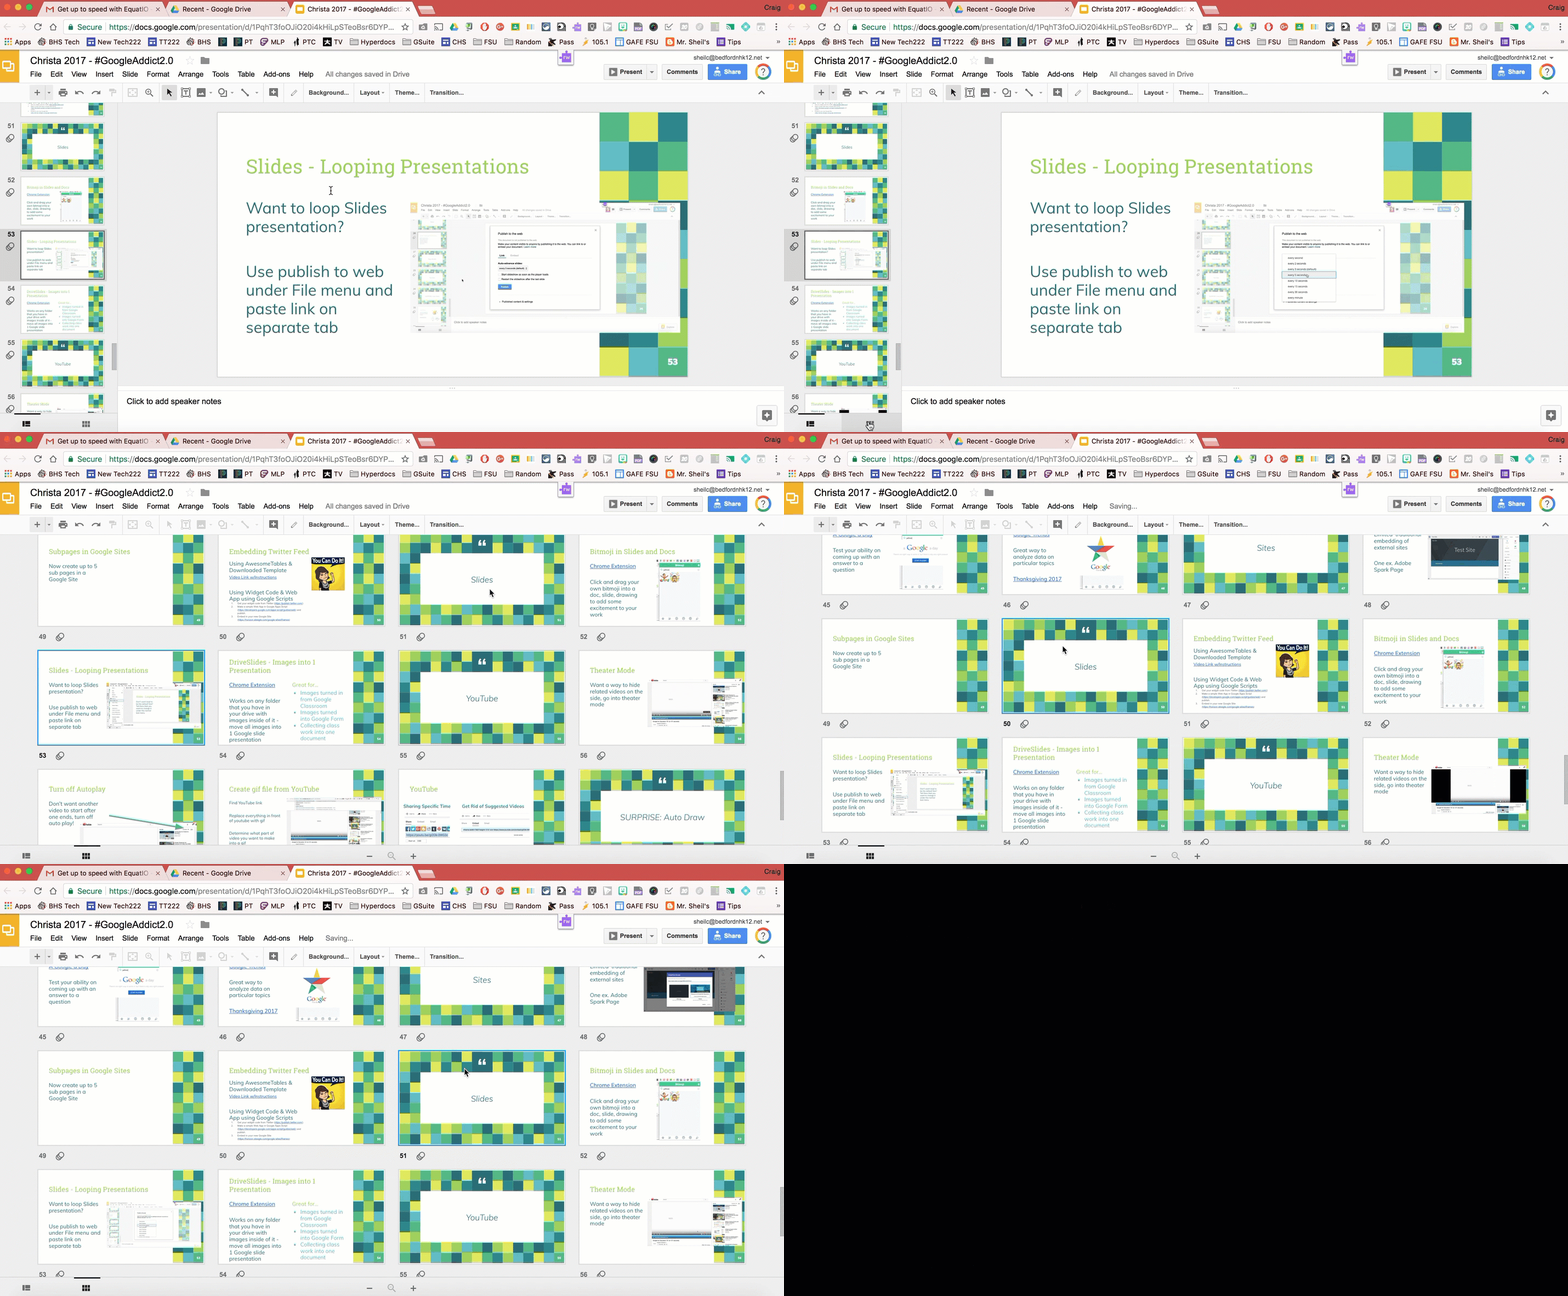
Recently, Slides received an update where you could view your slides beyond the left side bar. You can actually have them show up in block mode on the entire screen. This way you can see the layout of the slides a bit better and easily move slides around. Just double click on a slide to get back into editing it.

How to make this happen? Select the block icon on the bottom left (under all of the slides).

And that is my Spiel…

Day 1 of Google: YouTube Tips

On the first day of Google….

We are going to take a look at YouTube. Hard to find someone out there now a days who has not used YouTube, either for their own enjoyment, or to share ideas/content in a lesson with students.

But, did you know the following:

Autoplay of YouTube Videos
1. The default to YouTube is for related videos to automatically play for you after your last video finishes. In some instances, you might want this. I am sure many can relate to watching a video that a friend has shared with you or posted on a social media outlet, you start to watch the video and then get hooked and end up watching other videos that are related to the same topic. Then 30 minutes later, you wonder where the time went!

However, in a school setting, you might not want a new video to start automatically – especially if you haven’t had a chance to view the next video prior to students seeing it. There is a very easy way to stop autoplay.

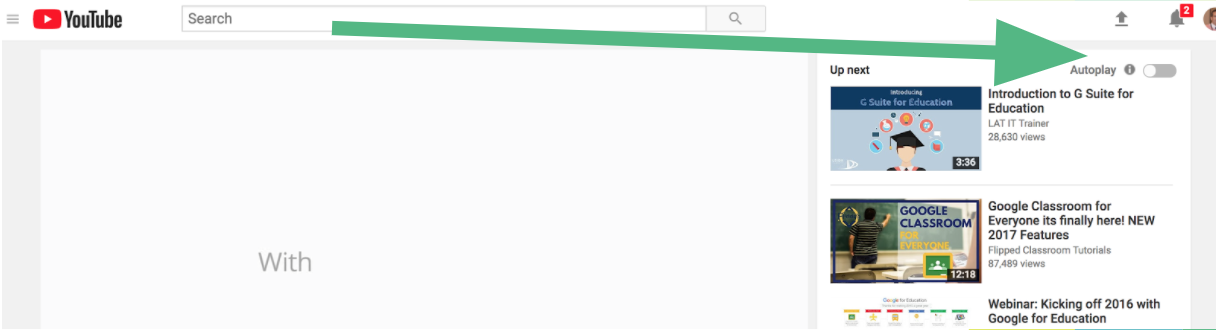
  • Search for a video
  • Top right, above the suggested “up next videos”, you will find Autoplay – just turn it off

Theater mode for YouTube
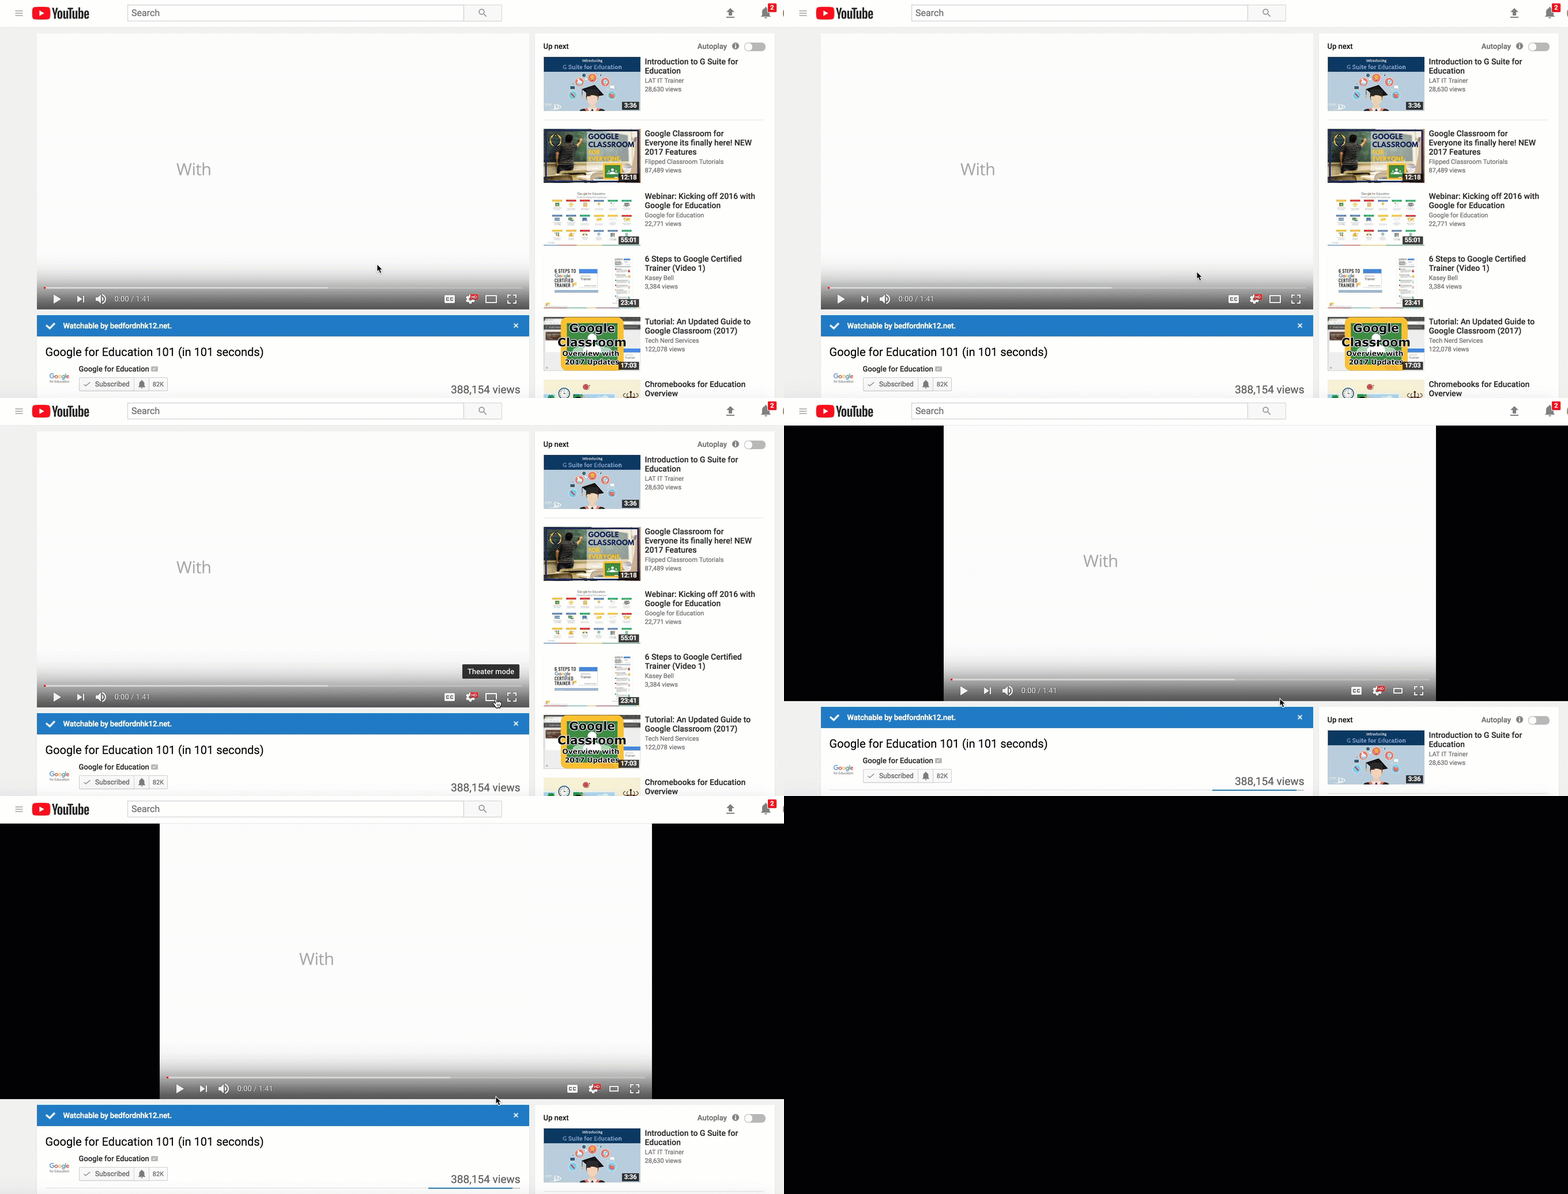
2. The default in YouTube is for the video that you searched to show up on the left side of the screen and the ‘up next/suggested videos’ to show up on the right. You actually have a way to move related content below the YouTube video. This way, there is less distractions if you are projecting your screen. No matter what video you search, switch the view to Theater mode (bottom right corner of the YouTube video).
True 360 Videos
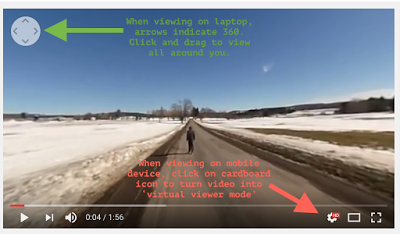
3. Virtual Reality is a buzz word right now. Some teachers are looking for ways in which this concept can be implemented appropriately into curriculum. One particular way, is finding 360 videos in YouTube that could either be viewed in a VR headset or on a laptop/Chromebook. While there is a bit more effort to view on a Chromebook/laptop (in terms of clicking and dragging around in the video), you can still get a similar experience as if you were watching in a VR headset.

If you are interested in exploring around more 360 videos, add ‘360’ in your search. However, some people who upload a video might consider a video 360 when in reality it isn’t. A true 360 video will have the four arrows on the top left corner of the video. This allows you to ‘look behind you’ or ‘look above’ etc by either using the arrows or clicking and dragging inside of the video.

To learn more about how to create your own 360 video, read this previous blog post.

And that is my Spiel…

12 Days of Google

In the spirit of the season and the inspiration from Eric Lawson and Eric Curts, I have decided to run my own ’12 Days’ of tech tips and ideas. For the next 12 work days, I will provide a Google Tip/Trick that might help take your Google knowledge to the next level.

In the embedded Google Drawing below, I will link up each tip or idea each working day moving forward. (You might have to open up the Google Drawing in order for the icons to actually provide the Google Tip of the Day). You will also notice below the Google Drawing, I will have each day linked up.

Wishing everyone a happy and healthy holiday season!

And that is my Spiel…

Day 1 of Google: YouTube Tips
Day 2 of Google: The Many ‘Different Views’ to Google Slides
Day 3 of Google: Exploring with Google Trends
Day 4 of Google: Google Calendar
Day 5 of Google: Providing Feedback in Google Docs
Day 6 of Google: Google Drive – Location of Files
Day 7 of Google: Google Classroom – Creating to Accessing Student Work
Day 8 of Google: Chrome Keyboard Shortcuts
Day 9 of Google: Google Keep Features
Day 10 of Google: equatIO for Math and Science classes
Day 11 of Google: Change Default Text in Google Docs
Day 12 of Google: Creating Your Own GIF with AutoDraw, Google Photos & Google Slides

Curate Images with DriveSlides

DriveSlides is a chrome extension that was created by Matt Miller and Alice Keeler to help get images into one place, more specifically into a Slides presentation. Below, I have provided an explanation of how the extension works as well as given a couple of examples in how this tool can be implemented.

How the extension works:

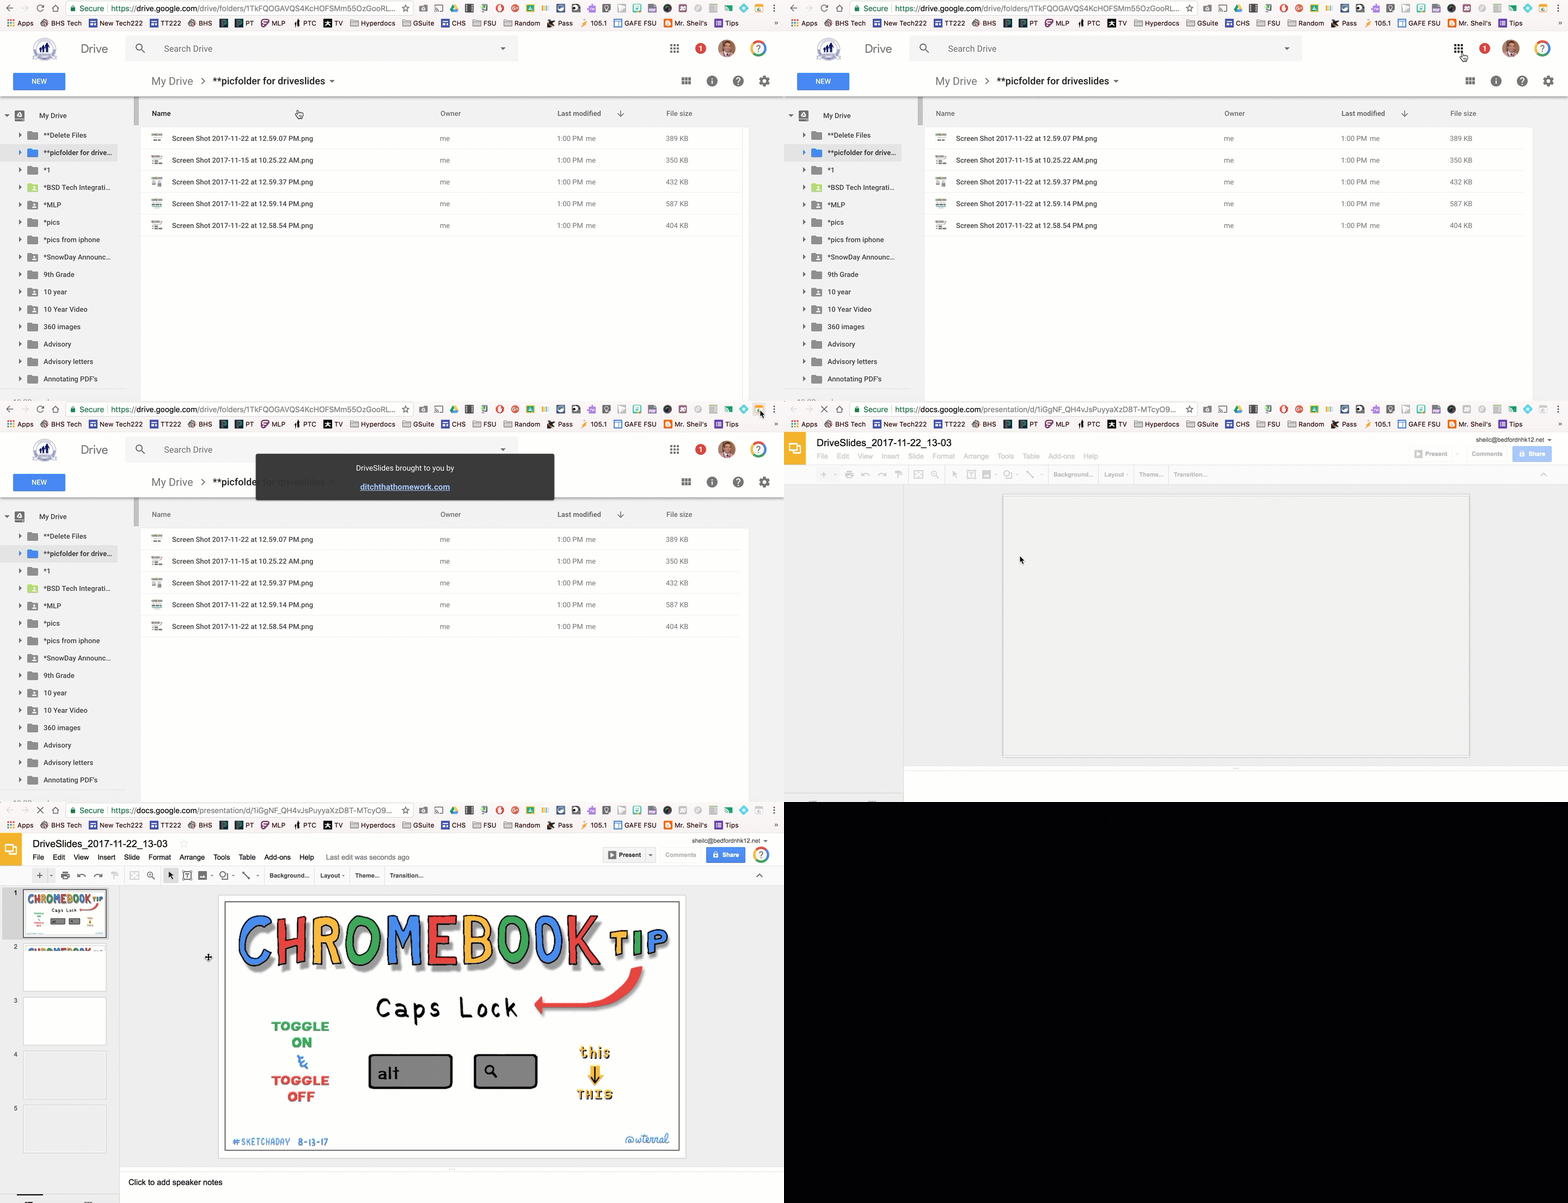
  • Curate all images into a folder in your Drive
  • Be sure to open said folder showing the list of all images
  • Select the chrome extension DriveSlides
  • Automatically, the extension will curate all of the images in the folder and place each one on its own slide in one Google Slide presentation. You will notice that the Slide presentation is located in the same folder as the images for further access.
You really cannot ask for a simpler process in getting images into one place. Alice Keeler is all about helping educators (and students) be more efficient with their time.
DriveSlides Examples
Curating Pics for Staff Slideshow
On our first staff day for the school year, it is tradition to watch a slideshow of staff experiences over the summer. Here staff can celebrate marriages, highlight family outings, and/or share new experiences. In past years, staff photos were curated in different ways:
  • Staff would email individual photos to the person who was creating the slide presentation. You could image the number of emails that this person must have received. Then to only download each picture to their desktop, followed by inserting the downloaded image into a Google Slide presentation.
  • Staff would add their own pictures to a shared Google Slide presentation. You could image that this is not as fun as staff could see what others had imported prior to the first staff meeting showing.  
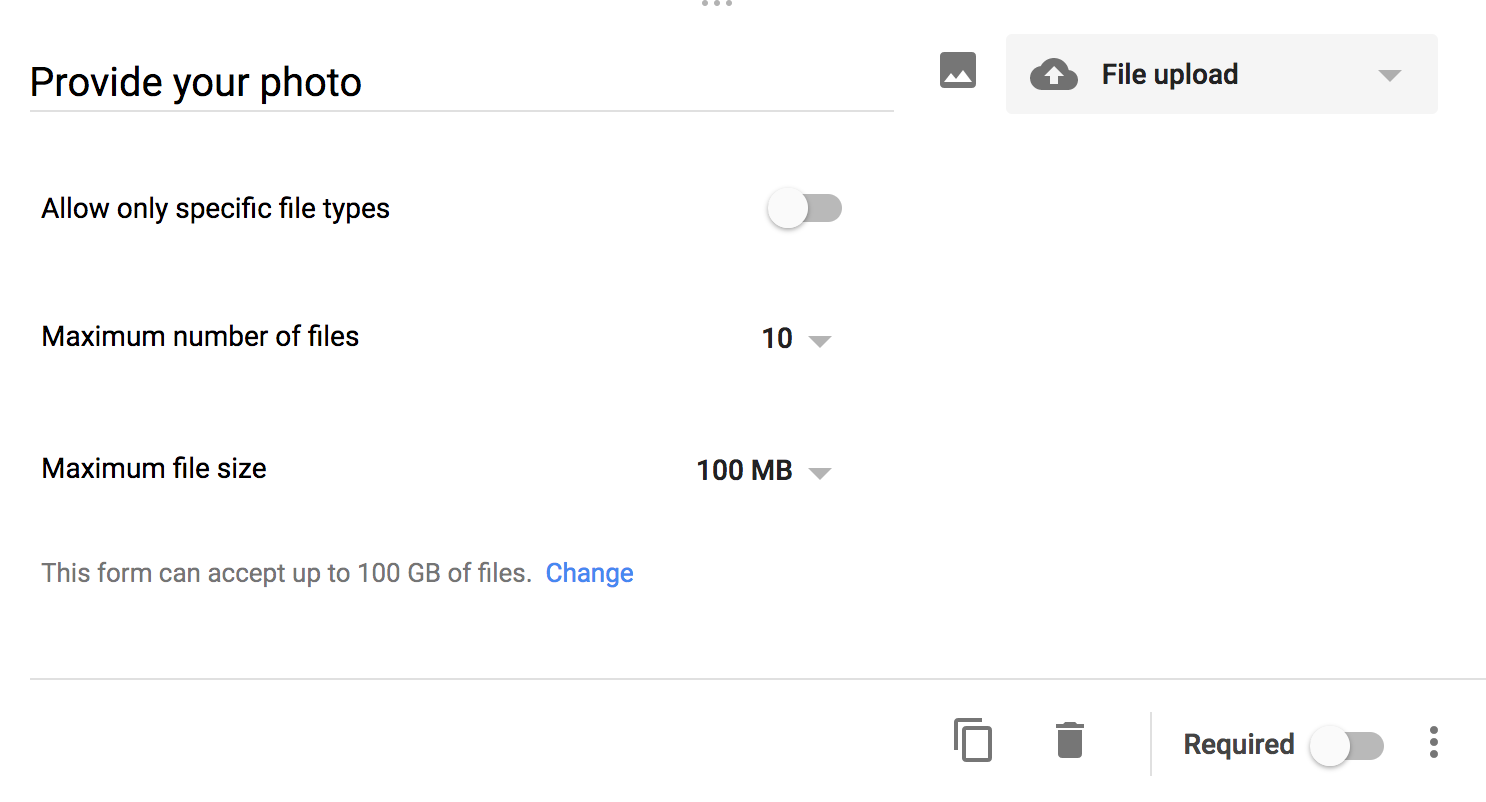
This past year, Mrs. Croft, created a Google Form and asked one simple question. Upload your photo. She allowed staff to fill out this form as much as they wanted. Because of the way the ‘File Upload’ question works in Google Forms, a folder is automatically created in Google Drive. Here, Mrs. Croft was able to open up the folder and use DriveSlides to automatically move all the images into a Google Slide presentation. From there, she was able to move slides around, add text to some slides, as well as insert her own slides to create title slides. DriveSlides, saved her a lot of time.

Note: With the ‘File Upload’ option in Google Forms, participants filling out the form must be signed in with their Google account in order to submit a file to you.

Google Classroom Assignment
With the design of how Google Classroom has been created on the backend, DriveSlides works perfectly. To help with organizing files, for every assignment that is created in Google Classroom, a folder is made. Thus, if you ever have students turn in an image, such as:
  • photos taken for photography class
  • screenshots showing graph created in Desmos
  • picture of written work from webcam on Chromebook
you can use DriveSlides to curate them all in one Slide presentation.

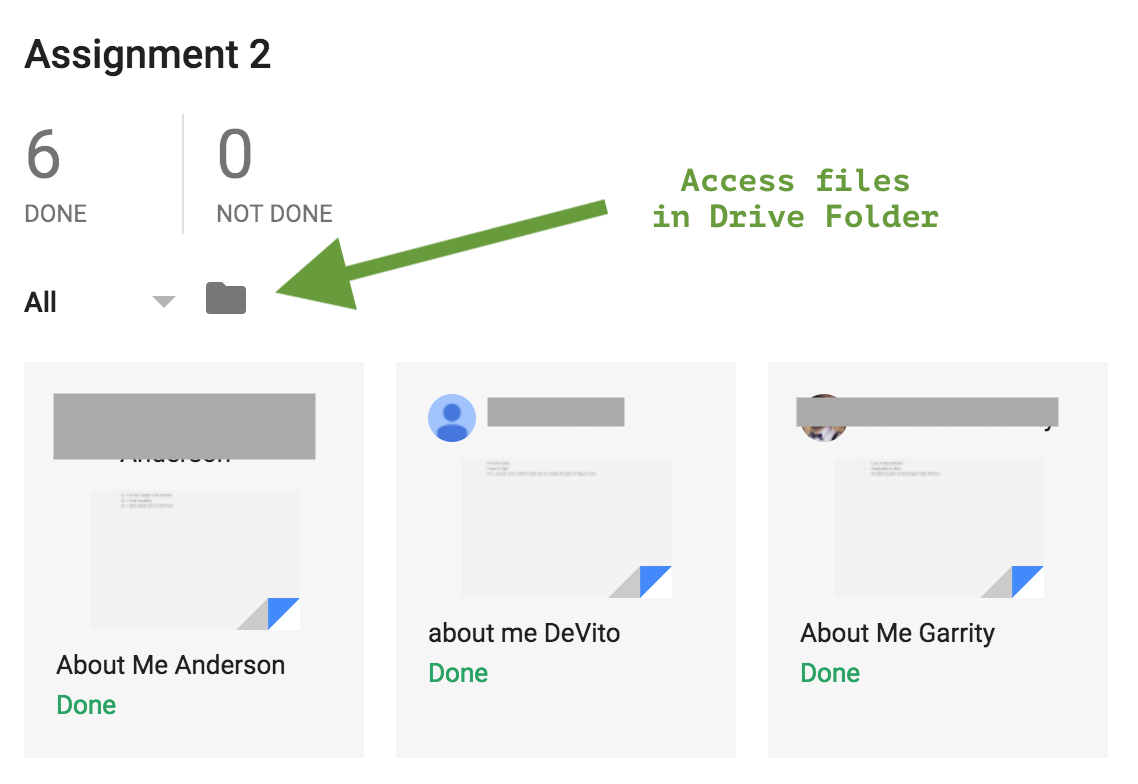
Once you open an assignment in Google Classroom, you will find a folder icon above all of the files turned in. You would select this folder icon to then view all images uploaded in the folder view. This would allow you to then use DriveSlides.

You might say, well why do I need all student work from the class in one slide presentation. Maybe you

  • want a way for students to collaborate and provide feedback on each piece of work. With the appropriate sharing permissions (anyone with the link can edit), you can allow all students in the class edit that one Google Slide presentation and provide feedback/add content.
  • want an easy way to show what the overall class thought process was like after the lesson
  • want an easy way to share student learning with administration
The possibilities are endless with this chrome extension. If you are interested in learning more about how you can use this extension with your curriculum, you know where to find me. 
And that is my spiel…